Archived Blog Posts
Responding to Burst Pipes: Emergency Actions to Take
2/5/2024 (Permalink)
Burst pipes can quickly turn into a homeowner's worst nightmare, flooding properties and causing extensive damage. Responding promptly and effectively is crucial to minimize destruction and protect your home. In this blog, we will outline the essential emergency actions to take when faced with burst pipes, helping you mitigate the damage and initiate the restoration process.
Shut off the Water Supply
Locate the main water shut-off valve and turn it off immediately to stop the flow of water. This step is crucial in preventing further flooding and damage. Ensure that everyone in your household knows the location of the shut-off valve and how to operate it.
Turn Off the Electricity
Water and electricity do not mix. To prevent electrical hazards, turn off the power supply to affected areas. If you are unable to access the distribution panel safely, contact an electrician for assistance. Remember, safety should be your top priority in dealing with burst pipes.
Open Faucets and Drains
After shutting off the water supply, open all faucets to relieve excess pressure and allow any remaining water to drain out. This step can help minimize the potential for further damage and pipe ruptures. Additionally, if you have floor drains, remove any objects obstructing them to facilitate water drainage.
Collect and Remove Standing Water
Quickly remove any standing water to prevent it from seeping into walls, floors, and belongings. Use buckets, mops, or a wet/dry vacuum to extract as much water as possible. If the amount of water is significant, consider contacting a professional water damage restoration company equipped with specialized equipment.
Contact a Professional Restoration Company
Burst pipe incidents require the expertise of a professional restoration company like SERVPRO to handle the cleanup and restoration process effectively. Their trained technicians will have the proper equipment, knowledge, and experience to efficiently mitigate the damage caused by burst pipes.
Document the Damage
Take photos and videos of the damage caused by the burst pipes. Document the affected areas, belongings, and any visible water-related issues. These records will be crucial for insurance claims and will help ensure that all damages are properly assessed and covered.
Prevent Further Damage
While waiting for the restoration professionals to arrive, take steps to prevent further damage. Place buckets or containers under leaks to collect dripping water. Use towels or rags to sop up excess moisture from furniture and other surfaces. Air out affected areas by opening windows or using fans to aid in the drying process.
Notify Your Insurance Provider
Contact your insurance provider as soon as possible to report the burst pipe incident. They will guide you through the claims process and inform you of any necessary steps or documentation required.
Responding promptly and efficiently to burst pipes is essential in limiting the damage and protecting your property. By shutting off the water supply, turning off the electricity, opening faucets and drains, collecting standing water, contacting professionals, documenting the damage, preventing further damage, and notifying your insurance provider, you can effectively navigate the emergency situation and initiate the restoration process.
Flood Barriers and Sandbags: Effective Techniques for Flood Defense
1/8/2024 (Permalink)
Floods pose a significant threat to both residential and commercial properties, causing extensive damage and disruption. Fortunately, there are effective techniques available to mitigate flood-related risks. In this blog, we will explore two popular flood defense methods: flood barriers and the use of sandbags. Understanding the benefits and proper implementation of flood barriers and sandbags can help individuals and communities better protect themselves against the destructive forces of flooding.
The Role of Flood Barriers
- Understanding the purpose and benefits of flood barriers in flood defense strategies.
- Exploring different types of flood barriers, including temporary, demountable, and permanent options.
- Highlighting the versatility of flood barriers, as they can be customized to fit various structures and landscapes.
Types of Flood Barriers
- Detailing the features and applications of common flood barriers such as inflatable, self-closing, and modular systems.
- Discussing the advantages of each type, including quick deployment, ease of maintenance, and cost-effectiveness.
- Showcasing real-life examples of successful flood barrier installations and their impact on flood mitigation.
Understanding Sandbags as a Flood Defense Technique
- Highlighting the traditional and widely-used approach of using sandbags as a temporary flood defense measure.
- Explaining the benefits of sandbags, such as their availability, affordability, and ease of use.
- Providing step-by-step instructions on proper sandbag placement and stacking techniques to maximize their effectiveness.
Best Practices for Sandbag Deployment
- Addressing the importance of planning and preparation before a flood event, including estimating the number of sandbags required.
- Providing safety guidelines for handling sandbags and ensuring they are properly filled and securely placed.
- Discussing the potential limitations of sandbags and when additional flood defense measures may be necessary.
Supplementary Flood Defense Measures
- Highlighting the benefits of combining flood barriers and sandbags with other flood mitigation strategies, such as landscaping modifications and water-resistant building materials.
- Exploring the use of floodproof doors, non-return valves, and flood-resistant coatings in flood-prone areas.
- Encouraging individuals and communities to consult with professionals specializing in flood defense to determine the most effective combination of techniques for their specific needs.
Implementing effective flood defense techniques is crucial for protecting lives, property, and infrastructure in flood-prone areas. Flood barriers, both temporary and permanent, along with the use of sandbags, offer practical and reliable methods to minimize flood-related risks.
By understanding the benefits, proper implementation techniques, and supplementary measures available, individuals and communities can significantly enhance their resilience when faced with the relentless power of flooding. Remember, proactive planning and collaboration with flood defense professionals are key to building a robust flood defense strategy that reduces the impact of floods on our lives.
Fire Safety Plan for Families: A Comprehensive Guide to Protecting Your Loved Ones and Home
11/15/2023 (Permalink)
 Creating a fire safety plan is important to ensure your safe incase of a fire.
Creating a fire safety plan is one of the most important steps you can take to protect your family and home. In this blog, we will guide you through how to create a fire safety plan for your family, providing practical tips for prevention, detection, and evacuation.
Step 1: Prevention
Prevention is key to fire safety. Conduct a home inspection to identify potential hazards, such as outdated wiring, overloaded outlets, or flammable materials. Ensure that smoke detectors are installed in every room and tested regularly. Develop safe cooking habits, such as never leaving stovetops unattended and keeping flammable materials away from heat sources.
Step 2: Detection
Early detection of a fire can save valuable time and lives. Install smoke detectors and carbon monoxide detectors, testing them regularly to ensure that they are in working order. Consider investing in a monitored fire alarm system, which alerts authorities automatically, even if you are not home.
Step 3: Evacuation
Knowing what to do in the event of a fire is essential. Develop a clear evacuation plan, outlining routes and designated meeting points outside the home. Practice drills with your family at least twice a year, ensuring that everyone knows how to exit the building safely. Teach children how to dial 911 in case of an emergency, and discuss alternate exits in case of blocked pathways.
Step 4: Additional Considerations
In addition to prevention, detection, and evacuation, there are additional considerations that can enhance your fire safety plan. Ensure that all family members know how to operate a fire extinguisher and that one is within reach. Keep important documents and emergency contact information in a fireproof safe or off-site location. Develop a plan for pets, ensuring that they are included in the evacuation route.
Step 5: Regular Review and Updates
A fire safety plan should not be a one-time exercise. It is important to regularly review and update your plan to account for any changes in your home, such as renovations or new occupants. Test your smoke detectors and carbon monoxide detectors periodically and replace batteries as needed. Conduct practice drills to reinforce the evacuation plan with all family members, including children and elderly individuals. Stay informed about new fire safety technologies or best practices that can enhance the effectiveness of your plan. By staying proactive and making necessary adjustments, you can ensure that your fire safety plan remains robust and ready for any emergency.
Creating a fire safety plan for your family requires attention to detail and preparation. By focusing on prevention, detection, and evacuation, and factoring in additional considerations, you can protect your loved ones and home from the devastating effects of a fire. Start planning today to ensure a safe and secure tomorrow.
The Hidden Dangers of Mold in Your Home
10/24/2023 (Permalink)
Mold growth in your home is more than just an eyesore; it can lead to serious problems you might not even be aware of. In this blog, we will explore the often overlooked dangers of mold in your living space. Understanding these risks will highlight the urgent need to address mold infestations to protect your home and its occupants.
Structural Damage
Mold can silently invade and weaken the structural integrity of your home. It thrives on damp surfaces and can penetrate walls, ceilings, and wooden structures, compromising their strength over time. The constant moisture, often caused by undetected leaks or inadequate ventilation, provides an ideal environment for mold to thrive. If left unaddressed, mold can lead to costly repairs or even the need for extensive renovations. The gradual deterioration of building materials can undermine the stability of your home, jeopardizing the safety of you and your family.
Decreased Indoor Air Quality
Mold releases tiny spores into the air, reducing the quality of the indoor environment. Even if you cannot see the mold, these spores can be present and inhaled by residents. Poor indoor air quality can cause discomfort, triggering allergy-like symptoms such as sneezing, coughing, or irritated eyes. Furthermore, mold can emit a musty odor, affecting the overall freshness and pleasantness of your home.
Unseen Hazards Behind Walls
Mold growth is not always visible. It can thrive in hidden places such as behind walls, under carpets, or in areas with poor ventilation. This hidden mold poses a danger, as it can go undetected for extended periods, causing damage to the structure and affecting indoor air quality without the homeowner even realizing it. Regular inspections and vigilance are necessary to identify and address mold issues before they become widespread. Proper maintenance and prompt action can prevent the accumulation of hidden mold and its associated risks.
Negative Impact on Property Value
When it comes time to sell your home, the presence of mold can have a significant impact on its value. Prospective buyers may be hesitant to purchase a property with a history of mold infestation, as it indicates potential maintenance issues and can be a health concern. Mold remediation costs may also affect the final selling price. By addressing mold promptly, you can prevent a decrease in property value and maintain a desirable living space.
Understanding the hidden dangers of mold in your home is essential for protecting your investment and ensuring a safe living environment. By recognizing the potential for structural damage, decreased indoor air quality, and the negative impact on property value, you can take proactive steps to address mold issues promptly, preserving the integrity and comfort of your home.
Restoring the Waves: A Step-by-Step Guide to Water Damage Restoration
10/3/2023 (Permalink)
Experiencing water damage in your home can be overwhelming, but knowing the step-by-step process of water damage restoration can help you navigate through the recovery process more efficiently. In this blog post, we will walk you through the comprehensive steps involved in restoring your property after water damage occurs, ensuring a thorough and effective restoration.
Emergency Response and Assessment
The first step is to contact a professional water damage restoration company as soon as possible. They will provide an emergency response and dispatch a team of experts to assess the extent of the damage. They will identify the source of the water and evaluate the affected areas to determine the appropriate restoration plan.
Water Extraction and Removal
The next crucial step is to remove standing water from your property. Using specialized equipment such as pumps, vacuums, and water extraction tools, the restoration team will efficiently extract the water from your floors, walls, and any other affected areas. The goal is to remove water quickly to prevent further damage and halt the progression of mold growth.
Drying and Dehumidification
After the removal of standing water, the drying process begins. Industrial-grade dehumidifiers and high-powered air movers are used to effectively dry out the remaining moisture in the affected areas. This step is crucial to prevent structural damage, mold growth, and the development of unpleasant odors.
Cleaning and Sanitization
Once the affected areas are thoroughly dried, the restoration team will clean and sanitize all surfaces, furniture, and belongings affected by the water. This includes removing any debris, sanitizing affected areas, and implementing mold prevention techniques. Professional-grade antimicrobial treatments may be applied to inhibit the growth of mold and bacteria.
Restoration and Repairs
The final step in the water damage restoration process is the restoration and repairs of any structural damage. This may include replacing damaged drywall, flooring, or furniture, as well as repairing any electrical or plumbing issues that may have contributed to the water damage. A reputable restoration company will have skilled craftsmen who can restore your property to its pre-damaged condition.
Continuous Monitoring
Throughout the restoration process, the professionals will monitor moisture levels to ensure that the affected areas are thoroughly dry and free from any residual moisture. This ongoing monitoring helps prevent further issues such as mold growth or recurring water damage.
Water damage restoration is a complex process that requires professional expertise and specialized equipment. By understanding the step-by-step process outlined above, you can better navigate the restoration journey and have peace of mind knowing that your property is being restored effectively. Remember to reach out to a trusted water damage restoration company promptly after experiencing water damage to ensure a swift and thorough recovery of your home.
Safeguarding Older Homes from Storm Damage in the St. Louis
9/12/2023 (Permalink)
Nestled within the historic charm of the St. Louis area are older homes that tell stories of a bygone era. While these homes exude character and nostalgia, they may be more susceptible to storm damage due to aging structures and materials. In this blog, we'll explore actionable steps to protect older homes from the wrath of storms, helping you preserve the beauty of the past while fortifying against the challenges of the present.
Recognizing Vulnerabilities
Before delving into protective measures, it's essential to identify vulnerabilities that older homes might face during storms:
Outdated Materials: Aging roofs, windows, and siding may not provide the same level of protection as modern alternatives.
Foundation Issues: Settling or deterioration of the foundation can lead to water intrusion during heavy rainfall.
Weakened Structure: Over time, the structural integrity of an older home may be compromised, making it susceptible to wind damage.
Inadequate Drainage: Older homes might lack proper drainage systems, increasing the risk of flooding and water damage.
Fortifying Your Home
Roof Inspection and Maintenance: Regularly inspect the roof for loose shingles, leaks, and signs of wear. Reinforce the roof with updated materials if needed.
Windows and Doors: Seal gaps around windows and doors to prevent water intrusion. Consider upgrading to impact-resistant windows if appropriate.
Siding Reinforcement: Replace damaged siding and consider adding weather-resistant siding materials for better protection.
Foundation Inspection: Address any foundation issues promptly to prevent water infiltration. Consider waterproofing measures.
Gutter Maintenance: Keep gutters clear of debris to ensure proper water drainage away from the home's foundation.
Tree Trimming: Trim overhanging branches and trees near your home to prevent potential damage during storms.
Insurance Considerations
Review your homeowner's insurance policy to understand the coverage for storm damage. Consider adding endorsements that cater to the unique needs of older homes.
Historic Preservation
If your home is designated as a historic property, consult local preservation guidelines before making any modifications. There may be regulations that affect the types of upgrades you can undertake.
Regular Maintenance
Consistent upkeep is key to protecting older homes. Regular inspections and proactive maintenance can prevent small issues from escalating into major problems.
Final Thoughts
Owning an older home in the St. Louis area is a privilege that comes with responsibility. By understanding the vulnerabilities and taking proactive steps, you can ensure that your historic treasure stands strong against the forces of nature. Preserving the past while embracing modern protective measures allows you to enjoy the charm of your older home while safeguarding its future for generations to come.
Grill Cleaning 101: A Step-by-Step Guide to Getting Your Grill Ready for the Season
8/23/2023 (Permalink)
Grilling season is here, and no doubt you are looking forward to some mouth-watering barbecues with family and friends. However, before you get the grill going, it’s important to give it a good clean to ensure it’s safe and free of any leftover food or debris from last season. In this post, we’ll give you a step-by-step guide on how to clean your grill and get it ready for the season.
Turn Off the Gas Supply
Make sure your grill is turned off and the gas supply is disconnected before you start cleaning.
Clean the grates using a wire or nylon brush, scrape the grates to remove any stuck-on food or debris. This will help to prevent any unwanted (and potentially toxic) flavors from contaminating your food. Once you have scraped the grates, soak them in soapy, warm water for 30 minutes. This will help to remove any remaining gunk or residue.
After soaking, scrub the grates with a soft-bristled brush to remove any remaining grease or debris. Rinse the grates thoroughly with water and dry with a clean cloth.
Wipe Down the Exterior
Using a damp cloth and mild soap, clean the exterior of the grill, paying special attention to any areas that have been exposed to grease or food. Remove the cooking grates and clean the interior of the grill with a mild, non-toxic cleaning solution. Wipe down any surfaces, paying particular attention to the burner tubes and heat deflectors.
Once you have finished cleaning, reassemble the grates and turn on the grill to let it heat up for 10-15 minutes. This will help to burn off any remaining residue and sanitize the grates.
Don't forget to clean the drip pan underneath the grill. This is where grease and drippings accumulate. Remove the pan and empty any leftover liquid or debris. Scrub it with warm soapy water and rinse thoroughly. If your grill has disposable drip pans, replace them as needed.
Clean the Burner Tubes
Over time, burner tubes can become clogged with grease and debris, affecting the performance of your grill. Use a wire brush or a small bottle brush to clean the burner tubes. Check for any blockages and remove them carefully. This will ensure that the burners provide an even flame and consistent heat distribution.
If your grill has an electric igniter, clean it gently with a soft cloth. Make sure it is free from grease or dirt, as this can prevent it from working properly. If you have a gas ignition system, check for any loose connections and make sure the spark is igniting the gas. It's essential to clean and maintain your grill brush as well. After each use, give it a good rinse with water to remove any grease or food particles. Let it dry completely to prevent the growth of bacteria. If your brush has worn bristles or is not in good condition, consider replacing it for better cleaning performance.
Store Your Grill Properly
Once you have finished cleaning, make sure your grill is completely dry before covering it or storing it for an extended period. Moisture can lead to rust and other damage. Use a grill cover or store it in a dry, covered area to protect it from the elements.
Cleaning your grill regularly not only ensures food safety but also helps prolong the life of your grill. Make it a habit to clean your grill after each use and perform a thorough cleaning at the beginning and end of the grilling season. This will keep your grill in good condition and ready for use whenever you crave some delicious barbecue.
Remember, a clean grill is not only important for food safety but also for optimal grilling performance. By following these tips and maintaining a proper cleaning routine, you can enjoy flavorful and safe meals all season long. Happy grilling!
Dealing with a Toilet Overflow - Steps to Take for Effective Cleanup
7/28/2023 (Permalink)
A toilet overflow can be a messy and stressful situation to handle. Whether it's due to a clog, a malfunctioning float valve, or any other issue, it's crucial to act quickly and effectively to minimize water damage and restore cleanliness. In this blog, we will guide you through the steps to take after a toilet overflow, helping you navigate the cleanup process and ensure a hygienic and safe environment in your home.
Stop the Water Flow
The first step is to stop the toilet from overflowing further. Locate the water shut-off valve near the base of the toilet and turn it off by turning it clockwise. This will stop the flow of water and prevent further flooding.
Before starting the cleanup process, put on gloves, protective clothing, and footwear to prevent contact with contaminated water and potential pathogens. It's important to prioritize your health and safety throughout the process.
Remove Excess Water
Using towels, mops, or a wet/dry vacuum, remove as much standing water as possible. Be careful not to spread the water to unaffected areas. Dispose of the water in a toilet or a sink that is not affected by the overflow.
Dispose of any items that have come into direct contact with the toilet water and are not salvageable. This may include rugs, bath mats, or other absorbent materials. Bag them securely and dispose of them according to local regulations.
Clean and Disinfect
Thoroughly clean and disinfect all surfaces that have been affected by the overflow. Use a mixture of warm water and mild detergent to clean the area. Then, apply a disinfectant solution or a mixture of water and bleach (1:10 ratio) to eliminate bacteria and odors. Pay special attention to the toilet bowl, floor, walls, and any other areas that may have been splashed or contaminated.
After cleaning, ensure the area is properly dried to prevent the growth of mold and mildew. Open windows, use fans or dehumidifiers and allow for adequate airflow. If necessary, use moisture-absorbent materials like baking soda or silica gel packs to expedite the drying process.
Inspect for Damage
Check for any signs of water damage to the walls, flooring, or cabinets. If you notice any discoloration, warping, or softness, it's essential to address it promptly to prevent further damage and potential mold growth. Consider consulting a professional if the damage is extensive.
Monitor the affected area for any signs of mold growth in the days following the overflow. Watch out for musty odors, visible mold patches, or any allergic reactions. If you suspect mold, consult a professional mold remediation specialist to assess and address the issue.
Prevent Future Overflows
Take preventive measures to minimize the chances of future toilet overflows. Avoid flushing excessive toilet paper, feminine hygiene products, or other items that can cause clogs. Regularly inspect and maintain your toilet and plumbing system to detect and address any issues before they escalate.
Dealing with a toilet overflow requires prompt action and thorough cleanup to prevent water damage, contamination, and potential health hazards. By following these steps and taking preventive measures, you can effectively manage the situation, restore cleanliness, and ensure the safety and functionality of your bathroom. Remember, if the overflow is severe or the damage is extensive, it's advisable to seek professional assistance to ensure a thorough and proper cleanup.
5 Effective Ways to Prevent Flooding in Your Home
6/14/2023 (Permalink)
Flooding can be a major problem for homeowners, causing significant damage to property and potentially putting lives at risk. While it's not always possible to prevent flooding from occurring, there are steps you can take to minimize the damage and reduce the risk of it happening in the first place. Here are five effective ways to prevent flooding in your home:
Keep gutters and downspouts clean and clear
One of the primary causes of flooding is clogged gutters and downspouts. When debris accumulates in these areas, it can prevent water from draining properly and cause it to overflow. Regularly cleaning and clearing your gutters and downspouts can go a long way in preventing flooding.
Install a sump pump
Sump pumps are an essential tool in preventing flooding. They work by pumping excess water out of your home and away from the foundation. Installing a sump pump can be a wise investment to protect your property from water damage.
Use landscaping to your advantage
Landscaping can play a crucial role in preventing flooding. Planting trees and shrubs strategically can help absorb excess water and prevent it from pooling in areas around your home. Additionally, grading your lawn away from your foundation can help prevent water from seeping into your basement.
Seal any cracks and gaps
Small cracks and gaps around windows, doors, and foundations can be entry points for water. Sealing these areas can help prevent water from seeping into your home and causing damage.
Consider a backflow preventer
If you live in an area prone to heavy rainfall or flooding, installing a backflow preventer can be a smart move. This device works by preventing water from flowing back into your home's plumbing system, which can be a common cause of flooding.
By taking these five steps, you can significantly reduce the risk of flooding in your home and protect your property from damage. However, if you do experience flooding, it's important to act quickly to minimize the damage. Contacting a professional restoration company like ours can help ensure that your home is restored to its pre-flood condition and that any potential mold growth is addressed.
Clear the Air: How to Address Mold in Your HVAC System for a Healtheir Home
5/17/2023 (Permalink)
Mold is a common problem in households, and it can grow in many different places, including your HVAC (heating, ventilation, and air conditioning) system. HVAC systems provide an ideal environment for mold growth, as they create a damp, warm atmosphere. Mold in your HVAC system can cause secondary damages, as it can spread mold spores throughout your home. In this blog, we will discuss how to address mold in your HVAC system.
Identify the Source of the Mold
The first step in addressing mold in your HVAC system is to identify the source of the problem. Inspect your HVAC system thoroughly for any signs of mold growth. Look for visible mold on the vents, ductwork, and other components of your system.
Call in a Professional
Cleaning mold from your HVAC system is not a task that should be taken lightly. It's important to hire a professional to address the problem. A professional HVAC technician will have the expertise and equipment necessary to safely and effectively remove mold from your system. SERVPRO has professional experience and expertise to safely remove mold from your HVAC and ensure your home is mold free.
Inspect and Clean the Ductwork
The ductwork is the most likely place for mold to grow in your HVAC system. A professional HVAC technician will inspect the ductwork and clean it thoroughly to remove any mold growth.
Replace Air Filters
Mold spores can accumulate in your HVAC system's air filters, which can lead to further mold growth. Replace your air filters regularly to prevent mold spores from spreading throughout your home.
Maintain Your HVAC System
Regular maintenance of your HVAC system is key to preventing mold growth. Have your system serviced by a professional HVAC technician at least once a year. This will ensure that your system is clean and functioning properly, and can prevent future mold growth.
Addressing mold in your HVAC system is a task that should be left to professionals.
Mold can pose a significant threat to both your health and the integrity of your HVAC (Heating, Ventilation, and Air Conditioning) system. Mold thrives in moist and humid environments, making the dark and damp areas of your HVAC system an ideal breeding ground. Once mold spores find their way into the system, they can spread quickly through the air ducts, contaminating the air you breathe and causing various respiratory issues. Moreover, mold can compromise the efficiency and functionality of your HVAC system by clogging air filters, obstructing airflows, and damaging vital components such as coils and insulation. Regular maintenance, including cleaning and inspection of your HVAC system, is essential to prevent mold growth and ensure a healthy and efficient indoor environment.
Identify the source of the mold, call in a professional, inspect and clean the ductwork, replace air filters, and maintain your HVAC system regularly. By following these steps, you can prevent mold growth in your HVAC system and ensure a healthy indoor environment.
Is Your Rental Property Protected? Understanding Renter's Insurance Coverage for Fire Damage
5/1/2023 (Permalink)
If you're renting an apartment or a house, it's important to consider getting renter's insurance. Renter's insurance helps protect your belongings in case of damage or loss due to various circumstances such as theft, water damage, and fire. But does renter's insurance also cover fire damage? In this article, we'll discuss the details of renter's insurance and its coverage of fire damage.
Understanding what insurance covers
To start, it's important to understand what renter's insurance covers. Renter's insurance typically covers your personal belongings such as furniture, electronics, and clothing. It also provides liability coverage in case someone is injured while on your rental property. Additionally, some renter's insurance policies may cover additional expenses such as temporary housing if your rental property becomes uninhabitable due to a covered incident.
Coverage
When it comes to fire damage, renter's insurance generally covers the cost of repairing or replacing your damaged belongings. This coverage can also extend to damage caused by smoke and water used to extinguish the fire. However, it's important to note that not all renter's insurance policies are the same, and coverage may vary depending on the specific policy you have purchased.
Understanding the Circumstances
In addition, it's important to understand the circumstances that may affect your renter's insurance coverage for fire damage. For instance, if the fire is caused by your negligence, such as leaving the stove on or using faulty electrical appliances, your insurance company may not cover the damages. Similarly, if you fail to report the fire in a timely manner or fail to take reasonable precautions to prevent further damage, your insurance company may deny your claim.
It's also important to note that if you live in an area prone to wildfires, your renter's insurance policy may not cover damages caused by wildfires. In such cases, you may need to purchase additional coverage or a separate policy that specifically covers wildfire damage.
In conclusion, renter's insurance can provide valuable coverage for fire damage to your personal belongings. However, it's important to understand the details of your policy and the circumstances that may affect your coverage. By taking the time to review your policy and understanding your coverage, you can make informed decisions and ensure that you're adequately protected in case of a fire or other unexpected event.
What do I do after a pipe break?
3/6/2023 (Permalink)
A pipe break is a frustrating, stressful, and expensive problem to have. Fortunately, it's also something that can be fixed. In the meantime, here are some things you can do to minimize damage and speed up the repair process.
Turn off the water supply to the pipe.
The first thing you need to do is turn off the water supply valve for your home or business. This will stop any further damage before it can happen and keep you from wasting money on unnecessary repairs that could have been avoided if you had turned off the valve earlier. It's important that you know where this valve is located, so take some time now and check all of your pipes for signs of leaking or damage. If there's no sign of leakage anywhere else in your home, then this may be an easy fix but if there are signs of leaks or flooding in other areas around town, contact a plumber immediately.
Turn off the power to any heating or air-conditioning equipment near the leak.
Turn off the power to any heating or air-conditioning equipment near the leak, turn off the circuit breaker controlling your home's electrical supply. If you cannot locate a circuit breaker, call an electrician to turn off electricity at its source.
Clean up as much water as possible
Clean up as much water as possible using towels or mop, but do not use a vacuum cleaner. You want to stay away from electricity when your home suffers from a water loss. Vacuum cleaners can cause more damage because they suck up the water and pull it into the motor of your vacuum, which will then overheat and burn out your machine.
Call your local plumber for help.
In the event that you do experience a pipe break, it's important to know how to handle the situation. It's important to call your local plumber for help. If you try to fix the leak yourself, you could end up making things worse. Not only does this save money by avoiding unnecessary repair costs, but it also prevents damage to other pipes in your home or business. If you have any questions about how best to handle your leaky pipe problem, contact SERVPRO today!
Evacuation and Fire Escape Plan
2/5/2023 (Permalink)
If you have kids or pets, your evacuation plan needs to be tailored a little differently than that of a household without little ones. In this guide, we'll walk you through some basic steps and considerations when preparing for an emergency situation. Check out our tips below!
Evacuation Plan
When you have kids in your home it is safe to have an evacuation plan in place incase of an emergency. Have a fire escape ladder, a smoke alarm and a fire extinguisher installed in the area of the home where the kids sleep and train them how to use in the case of an emergency. Consider having a first aid kit and firer blanket in case of an emergency as well.
Fire Escape Plan
The location of your nearest fire escape is important to know. A fire escape is any exit that leads out of the inside of a building, and can be used to exit in case of an emergency. There are several types of fire escapes, an exterior balcony, an interior stairway or hallway, and even a ladder that can be used on the side of a building.
If you don't have access to a balcony or stairwell, you may have access to a ladder on the side of your apartment building. This kind of escape route could be helpful if there's not enough time for you or your family members to run down several flights of stairs before the fire reaches them. Some apartments will have bars over their windows, which would prevent anyone from climbing out this way without breaking through glass first.
Be sure to know where all smoke detectors are placed within each room so they're easy reachable during times when everyone needs them most. Practice a fire escape plan and have a plan B in place with your family in case of a fire emergency.
We hope that this guide has helped you to think about how you can prepare for a fire. It's important to put together an fire escape plan, and have a plan B in case your home doesn't have sprinklers or other safety features. Knowing the best way out of your home can save lives!
Black Mold: Everything You Need to Know
1/18/2023 (Permalink)
Black mold is one of the most common types of mold. If you see black mold in your home, it may be growing behind a wall or in the attic. Black mold can also grow on porous building materials like wood, drywall, and ceiling tiles if they're exposed to moisture for long periods of time.
Black Mold in Your Home
You can find black mold in other areas of your home, as well. Black mold will grow on wood, drywall, and other porous surfaces like carpets. The bathroom, kitchen, and basement are common places for black mold growth to occur because these rooms have high moisture levels which make it easier for mold spores to grow. If you have an attic or crawlspace in your home then these are also likely places where you may see black mold growing.
Mold Inspection
Mold inspection is necessary in order to determine the extent of the mold problem. You'll want to hire a professional certified individual or company who can provide you with an accurate assessment of your particular situation. This may include visual inspection, black light inspection, moisture meter testing, and more.
Remediating the Mold
If you discover black mold, don't try to remove it yourself. Black mold is often dangerous and should be handled by professionals trained in mold removal. If you discover black mold, don't try to remove it yourself. Black mold is often dangerous and should be handled by professionals trained in mold removal.
Mold remediation involves thorough cleaning of the affected area with specialized products to kill off any remaining spores or fungal growth. This may include using HEPA vacuums, sterile cloths, negative air machines and other equipment depending on the severity of your situation.
Mold removal can take a few days or weeks depending on how large the infestation is and whether or not you have to tear down parts of your home to get rid of it all. If you hire a professional, they'll remove all traces of black mold from your home and then sanitize everything with chemicals that are safe for humans but toxic for molds (like hydrogen peroxide). They'll also use ultraviolet lights that kill any remaining spores so that no new colonies can grow back in their place.
The professionals will wear protective gear like respirators and goggles so as not to breathe in too much dust while removing the infected areas. They will take protective measures against the mold to protect the rest of your home as well.
If you believe that you have black mold, it is important to call a professional remediation company like SERVPRO of St. Louis County. We are certified by the IICRC and licensed. Black mold can be hazardous, so it's important to get it removed as soon as possible. If you're looking for a professional remediation company in the St. Louis, MO area, contact us today!
3 Reasons a Basement Floods and How To Prevent It
1/1/2023 (Permalink)
Three Causes of Basement Flooding and How to Avoid It
A flooded basement has happened to many a homeowner. Because basements are at the lowest level of your home and partially underground, they are especially susceptible to flooding. Should your basement flood, you can work with a water cleanup and restoration service, but there are several issues you can watch for and act to mitigate to prevent water damage to your home.
1. Plumbing Leaks
A leaking or burst pipe is one of the most common culprits of water in a basement. Often a leak can go undetected for some time, so regular inspection of this part of your home is essential, especially if your basement is not used regularly.
2. Faulty Water Heater
A malfunctioning water heater is another likely reason for flooding in a home. An old tank can corrode, causing gallons of water to gush into your basement. Proper maintenance and inspection can help prevent a faulty tank from creating a major problem. If your water heater is over 10 years old, consider purchasing a replacement.
3. Excessive Rainfall
If your basement is not properly sealed, excessive water from a storm could find its way into your home and cause a basement flood. Inspect your basement walls and foundation and seal any cracks to prevent water from leaking in. Be sure to monitor storm drains near your home and make sure they are free from debris that can cause them to back up.
Water damage is a common problem for homeowners and one of the top five types of insurance claims filed by homeowners. All basement floods are not equal, so be sure you know what is and is not covered in your homeowner’s insurance policy. A licensed plumber or home inspector in Creve Coeur, MO, can visit your home and assess your risk of a basement flood. Understanding the risks and the maintenance required to limit potential damage is a must-do for all homeowners.
How To Recognize a Gas Leak
12/14/2022 (Permalink)
Everything You Need to Know About Gas Leaks
Natural gas is a very useful source of energy, but there are times when it can be harmful. This is especially true if your home has a gas leak. Natural gas leaks are extremely flammable and can cause serious injury if they aren't addressed immediately. If you suspect that your home has a natural gas leak, here's what you need to know about how to recognize one and what steps to take next.
Recognizing a Gas Leak
If you suspect a gas leak, there are signs to look out for. These include:
- A strong odor (like rotten eggs)
- Bubbling sounds
- Flames or sparks
The safest thing to do in this situation is to follow the steps listed below, ensuring you evacuate the property as quickly as possible.
Steps to Take After a Gas Leak
If you smell natural gas, or if you suspect a gas leak:
1. Turn off the main valve to your propane tank.
2. Call your propane supplier immediately (or call 911 if it's an emergency). If possible, have the phone number and address of where you are located ready to share with them when they answer the phone.
3. Leave the area immediately and close all doors behind you after exiting so that no one else disturbs or triggers any potential leaks as they try to enter or exit through that door. Do not re-enter until after a professional has arrived at your home/business and found no problems with your pipes/piping system.
If there is an open flame nearby - such as from a pilot light on a water heater or stovetop burner - attempt to extinguish those flames before leaving; once extinguished, leave immediately without taking anything with you (i.e., don't turn off lights).
Preventing a Gas Leak
Check for leaks. If you've recently used a new appliance, such as a dryer or stove, check for leakage from the connection points of the appliance in question—typically located at the back of it. You can also check by turning off all gas appliances in your home and then re-lighting each one separately to test whether there is any leakage when they are turned on again.
Keep adequate ventilation around gas appliances: Make sure there are no obstructed vents or exhausts on your range hood or laundry vent (also known as an "exhaust fan").
Don't use pilot lights to heat your home: If you have an older gas furnace that runs off of a pilot light instead of electricity, don't keep it running continuously; turn it off when you leave the house and turn it back on when you return. This will help prevent carbon monoxide poisoning and make sure everything is working properly without wasting energy unnecessarily!
A natural gas leak can be a serious hazard, dangerous and deadly. Gas leaks can cause explosions, fires and carbon monoxide poisoning. Natural gas also has the potential to cause property damage due to its flammability.
So, now that you know how to recognize a gas leak and what to do if there is one, it's time to make sure your home is safe. You don't want any of your family members or pets getting hurt because of a gas leak! If you think something might be wrong with the natural gas lines in your home, call an expert immediately.
If your home catches on fire due to a natural gas leak, give SERVPRO of St. Louis County a call.
What to Expect After Winter Storm Damage
12/1/2022 (Permalink)
 Drying out an area that was affected by floodwaters in Fernridge, MO.
What To Do After Water Damage From a Storm
After a winter storm in Fernridge, MO you may be at a loss. If your home has been damaged, you may be unsure of where to go from there. The best defense against storm damage is to be prepared in advance, and information is key. From water removal to what you may need to tear out, here are four steps to follow after water damage from a storm:
1. Extract Water
First and foremost, following a winter storm that has resulted in flooding, you need to extract the water. You can utilize the help of professional service to remove the water from your home so that you can begin the storm restoration.
2. Tear Out Wet Contents
Wet materials cannot stay in your home. Mold grows quickly. Within the first couple of days, you could have a serious mold situation on your hands. To avoid that or to guarantee that it doesn’t get worse, you should remove all wet contents as quickly as possible. This could be clothing, furniture or even drywall that is damaged beyond repair. Tear out anything that is wet and will not dry within the house.
3. Dry Out Flooded Area and Contents
You can lay out your contents in the sun to dry while waiting for the inside of your home to dry up also. Inside, you can utilize fans and dehumidifiers to rid it of moisture. Most people prefer investing in a dehumidifier to help rid the inside of any extra moisture.
4. Restore Home
Once you tear out any of the furniture or components of the house that is damaged beyond repair, you can work on restoring your home.
While laying out the steps seems simple, dealing with an actual flood can be a challenge. With the help of a restoration specialist, you can clean and build your home back to the way it was quickly and efficiently
What To Do If Your Washing Machine Leaks?
11/12/2022 (Permalink)
Washing Machine Leaks and What To Do
The washing machine is one of the most essential household appliances, so it’s no surprise that leaks can cause some serious damage. Water leaks are usually caused either by a faulty water hose or by a broken valve. Any leak in your home should be fixed as soon as possible to avoid further damage to flooring and walls. Here are some tips for fixing common washer problems and preventing future ones:
1. Inspect the Hoses
Check that there are no cracks or leaks in any of your washing machine hoses. Check for loose connections by simply pulling on both ends of each hose and making sure that it doesn't come off easily. If you see kinks, carefully straighten them out with a pair of pliers. Check for damaged hoses by running your hand along the length of each one to feel for rust or other signs of damage—a broken rubber washer can cause water to leak out during washing cycles, but these can usually be replaced cheaply at a hardware store. Leaks at the hose connections can also lead to flooding issues; if you notice any signs of leaking around where they attach to your appliance, look into replacing them before moving on!
2. Inspect the Water Shut-Off Valves
If your washing machine is leaking from the bottom, inspect the water shut-off valves. Make sure they are not leaking and check that they are connected properly. Check that they are not loose or broken.
3. Check for Loose Connections
If you suspect that the problem might be a loose connection, check to see that your hoses are properly connected and that they're not frozen. If there's any debris in the hose, try cleaning it out. If this doesn't work, you may need a new hose or a professional repairman to fix the leak.
4. Replace the Shut-Off Valves
Once you've checked the hoses and shut-off valves for leaks, it's time to replace them. If a hose is cracked or broken, you'll need to replace both of its ends in order to prevent another leak and potential flooding. (For example, if you have a double-hose washing machine with one hot supply line and one cold return line, replacing just one end of either line won't work.)
To replace a leaking shut-off valve:
- Turn off the water supply at the main valve (if possible).
- Unscrew the old shut-off valve from the faucet - take care not to let any water spill onto your floor!
- Install new shut-off valves using thread sealant tape where needed; tighten screws until snug but don't overdo it because doing so could crack plastic parts inside your washing machine housing unit which could cause more damage down the road.
Act Quickly
If you suspect that your washing machine has a leak, the first step is to check the hoses and connections. If any of the hoses are damaged, replace them with new ones after shutting off the water supply valve at the main water supply line.
Replacing a defective shut-off valve can be a bit tricky, so it's best to call in an expert if you're unsure how to do it yourself. You may also need to repair any damaged walls or floors caused by leaking water as soon as possible in order to avoid further damage or injury to yourself or others in your home.
Water leaks can cause serious damage to your washing machine and the surrounding area. The best way to avoid any problems is by repairing the leak as soon as possible. If you are unable to fix it yourself, then contact a professional plumber who will be able to fix everything for you. If you have a water damage event in your Maryland Heights, MO Home, give SERVPRO of Northwest St. Louis a call!
What to Do When Your Fire Sprinklers Go Off Accidentally
11/1/2022 (Permalink)
What to Do When Your Fire Sprinklers Go Off Accidentally
While fire sprinklers are there to protect your building, they can cause major issues such as flooding when they go off accidentally. It is best to have a plan in place in case this problem does occur. If this does happen, follow these guidelines to ensure that the damage is properly dealt with.
Shut off the Water Supply Line
The first thing you should do if you find yourself in this situation is to turn off the water supply line. This will stop the sprinklers from continuing to go off. This step is extremely important because the sooner you shut off the source, the less water damage there will be.
Clean up the Damage
In addition to cleaning up the standing water, you will need to deal with furniture and office equipment, and documents that got wet. You may want to consider calling a professional water restoration company to help you. The flooding needs to be taken care of as quickly as possible in order to avoid mold growth.
Call the Insurance Company
Your insurance company should be able to go over your policy with you to determine what is covered. You need to take pictures of everything that was damaged before you are cleaning up. They are far less likely to pay if you do not have evidence.
Determine the Cause
The insurance company will probably want to know what caused the fire sprinklers to go off in the first place. You may also want this information so that you can avoid having the same thing happen again later on. If you bring them to the manufacturer, they should be able to tell you what the issue was.
Acting fast is of the utmost importance when flooding occurs. Open all windows to begin ventilating the building until a water mitigation expert arrives. You can carefully begin to clean up wet areas, but they should be able to help you with the larger problems, such as wet carpets.
How do You Estimate a Fire Damage?
10/20/2022 (Permalink)
How Do You Estimate the Cost of A Fire Loss?
If you have experienced a fire in your home in St. Louis, we understand that this is an incredibly stressful time for both you and your family. There will be a lot of questions about what to do next and how long it will take for repairs to be completed. Our goal is to make this process as easy as possible by providing you with the answers you need right away.
What Is Fire Damage?
Fire damage can be caused by many different things, such as a fire in your home, business, or vehicle. For example:
- A fire in your home may cause smoke and soot damage to the structure of the place where it started.
- A fire might cause water damage to your home, business, or other nearby structures.
There are many other types of fires that can result in property damage—and each type of fire has its own unique problems associated with it.
The process of estimating a fire damage is an important first step to recovery.
It gives you an idea of the scope of the damage and how long it will take to repair. The estimate also serves as a starting point for negotiations with your insurance company, which can lead to more money for your claim.
The amount that you receive from your insurance company will be based on several factors: what type of structure was damaged by the fire; whether any materials were irreparably damaged; whether or not there were injuries associated with this incident; and what caused the blaze (for example, arson). These factors are all taken into consideration when determining how much money should be paid out by an insurer after they've received an estimate from a certified technician.
How do you estimate a fire damage?
The first step in estimating the fire damage is for us to assess the damage done by the fire with highly trained staff members who have years of experience in assessing properties post fire loss. This assessment is typically done within 48 hours from when it happened so that you will know exactly how much work needs to be done before the insurance claims process can begin.
SERVPRO of St. Louis County NW can estimate your fire loss.
SERVPRO of St. Louis County NW will assess your situation and provide you with a report of your damages and solutions for restoration. The process typically starts when we arrive on site. We'll ask questions about the damage to get a better understanding of what happened, and then begin to assess the property's overall condition.
If your home or business in the greater St. Louis area suffers from fire damage, don’t hesitate, and give our SERVPRO of St. Louis County NW team a call today! Our crew is highly trained and experienced in fire damage cleanup and restoration and offers our services 24/7.
What Should I Consider as Part Of the Fire Damage?
10/11/2022 (Permalink)
What To Do After a Fire
Fire damage can be devastating. The flames, smoke, and water all create a toxic mix that can affect the safety of others who live in your St. Louis home. In addition to being dangerous, fire damage can also be expensive if you don't handle it properly. When it comes to fire and smoke damage, however, there are several things you should consider before hiring a professional restoration company.
Things to Consider
In addition to the fire itself, there are several other things you should consider when it comes to fire damage. These include:
- The nature of the property damage. Fire damage can cause extensive damage to your property, including walls and roofs that have been burned away.
- The cause of the fire. Fires can be caused by many different things, including electrical fires, cooking fires, and negligence.
Contact Your Insurance Company
After you've gathered as much information as possible and given yourself a chance to process the situation, it's time to talk with your insurance provider. Insurance companies want their customers to be protected in case of emergencies like this one, so they can provide useful information on how best to go about getting help and support.
If you're not sure if you are covered for fire damage or if there are certain exclusions that apply (for example, if your policy doesn't cover electrical or lightning-related fires), get an estimate from an expert in your area by asking around for recommendations or by looking online. You should also check with your insurance provider for additional information about what types of assistance may be available under the terms of your policy.
Document all items that are damaged by the fire damage.
Documenting the fire damage is an important step in helping you recover from the fire damage and making sure your insurance claim is paid. Insurance companies will carefully evaluate your documentation, so make sure to get it right!
To help you record this information as accurately as possible, here are some guidelines:
- Write down all of the items you believe have been damaged by the fire damage. This includes things like furniture and clothing, electronics, appliances, and personal effects. If something isn’t listed here but seems damaged by smoke or water (or anything else), write it down anyway—you never know what could be useful later on.
- Make sure each piece has its own line item on your list; if there are multiple items in one room or area that need to be separately documented (for example two sofas), make sure each sofa gets its own line item on your list rather than combining them into one entry under “sofas” or something similar. You may also want to include how much each item cost originally when purchased; if nothing else this should give insurance adjustors an idea about whether or not replacing these items following a fire would be relatively affordable ($5k couches vs $50k antiques) so they can start estimating costs ahead of time before determining whether or not they need further investigation.
Hire a Professional
You should hire someone who has experience in restoring fire damage. You need to find a company that has experience with these types of restoration projects. They will be able to help you better understand the intricacies of your project and how they can help you restore it properly. SERVPRO of Northwest St. Louis is happy to be that expert for you!
Fire damage is complex, so it's important to hire a professional that understands it well enough to give you good advice on how best to fix your home or business after a fire.
There’s a lot to consider when it comes to fire and smoke damage. The good news is that by working with experts who have experience in this area, you can have confidence that we handle everything for you. We provide an initial assessment of the damage, then come up with a plan for how best to restore all your belongings. Our technicians will be able to clean up and remove debris from your home so there’s no interruption in living day-to-day life after the cleanup has been completed.
3 Ways Professionals Eradicate Smoke Damage
10/1/2022 (Permalink)
 Clean up after a fire in Manchester, MO.
Fire Restoration
When you think of fire damage, you probably see flames consuming a property, tearing the structure down. However, there is also another large issue in these types of disasters: smoke damage. For this reason, smoke cleaning practices can be imperative in dealing with any fire-damaged property in Manchester, MO. Here are three ways professional restoration experts may tackle this issue.
1. They determine the most effective cleaning method. Different materials call for varied ways of cleaning. For light damage, dry cleaning is often best. For heavier damage, wet cleaning may be required. Although wet cleaning is typically the stronger method of cleaning, it can’t be used for all materials. For everything else, spray-and-wipe cleaning and foam cleaning help. Additionally, there is abrasive smoke cleaning, which involves strongly scrubbing, and immersion cleaning, which involves soaking items in solution.
2. They move damaged items. Moving contents to a smoke-free location can help eliminate odor, giving it a chance to air out in a fresh environment. It can also protect the items from further damage that could occur if they are left in a fire-destroyed building. Finally, it clears space so building restoration can happen quicker.
3. They improve air quality. Generally, the main issue with smoke odor damage is the low quality of air after a fire. The smoke lingers, creating an unpleasant smell. One way to combat this is to change the HVAC filter, but professionals often use an air filtration device, ozone machine, or thermal fogger to improve the air. One thing you shouldn’t do is turn on any ceiling fans because their wiring could be ruined.
The above practices of smoke cleaning can help move the restoration process along, eliminating stress. Damage from fire doesn’t have to be debilitating if the correct steps are taken to restore a building’s contents. By relying on professionals to correctly clean and move objects and improve the air quality, you can be on your way toward recovery.
Why Does Mold Smell?
9/30/2022 (Permalink)
You probably associate mold with a damp, musty odor. In fact, you’d probably sniff it out before you ever saw it. Most of the time, you’re actually detecting the fungus itself; sometimes, though, you’re smelling mycotoxin production, which happens when specific types of mold create toxins.How Do I Know if It’s Mold?
How do you tell the difference between mold and a weird stench? Here are three signs you have mold in your building:
- The scent doesn’t go away when you open windows or run fans.
- The air smells damp even when the windows are open.
- You’re sneezing all the time when you’re in a specific area.
Why Does Mold Have an Odor?
The aroma doesn’t come from the fungus spores themselves, but rather from something called microbial volatile organic compounds. Some MVOCs are waste products of growing mold, including mycotoxin gases. MVOCs’ odors depend on how much moisture is around and the material the mold is growing on.
Stachybotrys, commonly called black mold, smells like cat urine and freshly cut grass. Chaetomium has an earthy or damp odor. Other species have scents like anything from baking bread to stinky socks to wet dog.
What if I Find Mold?
These funguses can hide in walls, carpets, and insulation, coming from water leaks or damp weather. You can help keep mold damage out of your building by:
- Keeping humidity levels low
- Fixing leaking pipes, roofs and windows
- Cleaning and drying a space after flooding
- Properly ventilating laundry, cooking and shower spaces
If you do find signs of mold, such as that musty odor, make sure the spores can’t migrate into other parts of your building. Put up plastic tarps to enclose the space and use HEPA air filters to keep the air clean. Don’t try to clean up mycotoxin contamination yourself. Instead, work with a mold remediation company in Country Life Acres, MO. Professionals have the proper equipment to get rid of the damage safely.
Protect Your Business’s Roof With 3 Simple Tips
9/15/2022 (Permalink)
Roof Damage Containment
If you are like most business owners, you probably think very little about the roof that covers your building. Nonetheless, if your roofing system springs a leak or otherwise fails, the damage to your company’s inventory and equipment can be significant. To avoid a catastrophe, you must work to contain roof damage.
1. Trim Overhanging Branches
You can’t control the weather. When a thunderstorm or tornado rolls through, wind damage can be extensive. While you can’t keep shingles from blowing off the roof of your business, you can keep overhanging branches from falling onto your building. By regularly trimming trees and removing other debris, you decrease the chances that a falling limb may crash through your company’s roof.
2. Schedule Routine Inspections
Roofs are funny things. Often, roof damage takes years to reveal itself. When it does, it may be too late to repair the roofing system. If you are worried about the condition of the roof over your business, schedule regular inspections. For new roofs, having a technician take a look every three or four years is likely sufficient. For older ones, ask someone to crawl on the roof every year or so.
3. Replace Old, Damaged, or Ineffective Roofs
Damaged roofs are dangerous. As such, scheduling a roof rebuild is simply something you can’t afford to delay. Replacing your company’s roof with a modern one is an effective way to protect the equipment and inventory inside your buildings. It is also a good way to safeguard your employees and customers.
Even with your best efforts, you may not be able to completely avoid roof damage. If your building’s roof springs a leak, the contents of your buildings may sustain considerable damage. Fortunately, a reputable restoration service in Creve Coeur, MO, can likely help you with clean-up. Still, to increase your odds of avoiding disaster, you must spend a bit of time thinking about your business’s roof.
What To Do When Disaster Strikes
9/6/2022 (Permalink)
 Disasters can never be fully anticipated, but there are key steps that can be taken to mitigate the impact.
Preparing for the Storm
Disasters are costly, often dangerous, and may require 24 hour assistance. Here are some steps to take when dealing with a disaster that will help you limit damage to your property and recover as quickly as possible.
1. Plan Ahead To Ensure a Fast Response
You are more likely to respond to a disaster quickly and efficiently if you make a plan ahead of time. Homeowners should inform their family or roommates of the disaster plan, taking care to practice key steps with children when necessary. Business owners should develop a disaster procedure and train employees to follow it. Be aware of the entrances and exits to your building, and display egress maps prominently in high traffic areas. Create a list of contact information for emergency services, community disaster resources, and 24 hour building restoration services.
2. React Appropriately
While some disasters are not immediately dangerous, all disasters increase the likelihood of danger. If you find yourself in a dangerous situation, the most important step is removing yourself from harm’s way. Once you are safe, inform those around you of the danger and report the disaster to emergency services.
Some disasters do not require emergency services. In these instances, assess the damage and determine what you can do to limit the spread of the disaster. This may mean moving undamaged items to a secondary location or making temporary repairs to your property. Be sure to document damage thoroughly for insurance purposes.
3. Repair and Restore
Whether you’re dealing with a leaking roof in your home or a kitchen fire in your St. Louis, MO, restaurant, restoring damage quickly is essential. SERVPRO is always open, with 24 hour cleaning and restoration services standing by to assist you. Customers will receive a call within an hour after initial contact. Personnel can be on site within 4 hours and can supply verbal instructions about your next steps within just 8 hours.
Disasters are stressful and even dangerous, but having a plan and responding appropriately can limit long-term damage and help you prepare to restore your property.
How You Can Prevent Water Damage in Your Home
9/1/2022 (Permalink)
 Water cleanup in a home in Bridgeton, MO.
There is a popular expression that an ounce of prevention is worth a pound of cure, and when it comes to preventing the appearance of water in home spaces where it has no place being, no truer words have ever been spoken. Here in Bridgeton, MO there are countless examples of homeowners having to hire a water damage repair company to perform cleanup from a broken pipe or a busted hose, yet if you keep an eye out for the signs of a problem by performing routine inspections and periodic maintenance, you can possibly avoid this costly path.
Steps You Can Take To Prevent Water Damage
To help in the prevention of water damage in the home, there are a number of things you should be regularly checking:
- Ventilation systems, heaters, and air conditioners
- Appliances
- Whole-house plumbing concerns
- Mold Growth
Water in a home is insidious insomuch as it can sneak into areas you cannot easily detect. A broken pipe cleanup is troublesome enough, but the slow leaks that are hard to spot can lead to damage that could already be quite substantial by the time the problem is finally found.
Check Appliances and Water Fixtures Regularly
You should check your heater and air conditioner twice a year to make sure they are working correctly. You should never see any water coming from these units. Appliances generally cause problems not so much because of the unit itself but rather a broken pipe or hose leading to the unit.
Bathrooms are an obvious location for water leaks because of all the fixtures in that room that use water. If home appliances and fixtures are leaking, mold growth can become a concern.
Things To Remember on a Daily Basis
You should always be on the lookout for any signs of water in home spaces where it does not belong. Even the smallest leak can be contributing to a much bigger problem beneath the surface, yet with some simple, regular maintenance, you can most likely avoid major water damage.
Do DIY Mold Tests Work?
8/20/2022 (Permalink)
Learn Why These Kits Are So Much Less Accurate
A business or commercial property owner might be tempted to try to save money by using a do-it-yourself or home mold test. Learn why these kits are so much less accurate than laboratory analysis of samples gathered by an indoor environmental specialist at a building in Maryland Heights, MO.
DIY Tests Detect Mold Spores
Airborne mold spores are present indoors and outdoors. A positive result on an amateur mold testing kit can indicate the presence of spores in air. These tests cannot identify growth or the toxicity of fungi.
Professional mold testing involves the collection and submission of samples from a building with a known or suspected mold infestation. A test may assess whether spore concentrations are high enough to suggest hidden mold growth or determine whether an infestation is toxic.
Lab Testing Identifies Species
There are anywhere from 100,000 to 300,000 types of mold. The positive identification of any species must be left to scientists in a lab. It may be necessary to cultivate spores from samples to determine which species of mold is present and pursue the best cleanup method.
Depending on when a property owner calls an indoor environmental specialist, testing may be used to determine if an infestation is present prior to removal and cleanup or after remediation to confirm all mold has been removed.
Professional Testing Is the Best Option
Consumer mold tests range in price. Any money a building or business owner spends on a DIY kit to test for mold is wasted, as professional sampling and laboratory cultivation and analysis are necessary to determine mold species and toxicity.
An indoor environmental specialist can take the samples necessary to detect mold growth and identify species of fungi. If hidden mold is growing within the walls of a commercial property in Maryland Heights, MO, an inspection and mold test are the best ways to assess the severity of the infestation.
Why Does My Toilet Leak When I Flush?
8/15/2022 (Permalink)
Common Causes Of A Leaking Toilet
If you notice your toilet leaking when you flush, don’t put off the repair. Even a small bathroom leak can cause serious damage to your floor, subfloor, and more. Avoid costly water damage restoration and check for these common causes of a leaking toilet.
1. Loose Bolts
Try tightening the bolts that connect the toilet to the floor. Using a wrench, tighten each bolt a quarter-turn or less at a time, alternating between bolts. Be careful not to overtighten, as this can crack the bowl.
2. Cracked Tank
Hairline cracks can be difficult to see, especially if they’re located in an out-of-the-way place. Inspect your tank thoroughly for cracks.
3. Worn Flapper
The flapper is the rubber part inside the tank that lifts when you flush. To check your flapper, add a few drops of food coloring to the water in the tank and wait for ten minutes without flushing. If the color begins to appear in the bowl, the flapper isn’t working correctly and could be the cause of your leaking toilet. The flapper is inexpensive and easy to replace.
4. Faulty Supply Line
The supply line can leak at the connections, or along the length of the tube. Certain types of supply tubes are prone to developing pinhole leaks and tiny cracks as they age. Run your hands along the entire supply line. Any dampness is a sign of a leak in the supply pipe.
5. Dry Wax Ring
Over time, the wax ring that seals your toilet to the floor can dry out or crumble. If water is leaking from the base of your toilet, a faulty wax seal is likely to blame. Replacing this ring is not difficult, but you will need to remove the toilet to do so.
If you still can’t determine what’s causing your leaking toilet, contact a Fernridge, MO, plumber to investigate the issue. Always repair a bathroom leak as soon as possible, before it becomes a bigger problem.
When a Toilet Overflow Damages 2 Floors
8/2/2022 (Permalink)
Three Ways To Mitigate Water Damage
If your multi-story commercial building in Manchester, MO has sewer damage or a toilet overflow, chances are pretty good that the water has contaminated more than one floor. Since the polluted water is considered a category three liquid, common cleaners are not considered adequate to abide by OSHA standards. Contacting a certified water mitigation team is the best first choice in dealing with water intrusion. Here are three steps the professionals often use to mitigate the problem.
1. Water Removal
After turning off the water and contacting the sewage company, the team may try to identify the source of the water. Once the source is located and identified as a cracked toilet bowl, overflowing base, or damaged wax ring, the liquid is removed, and the drying process can begin. While the area is drying, an inspection of damage can take place, and signs of secondary problems can be found.
2. Tear-Out
Water from an overflowing toilet is sewer damage and considered black water. That means the area will need to have a tear-out of all carpet, padding, wet insulation, and water-soaked plasterboard. If the water damaged more than one floor, tear-out can often include two-floor structures, one ceiling, and sometimes multiple walls. The area is then left to dry using commercial fans and dehumidifiers.
3. Area Disinfection
Once the area damaged by the flooded toilet water is completely dry, deodorization and disinfectants can be used to bring the area up to OSHA standards. This can sometimes include treating the bare wood with a mold inhibitor in case fungus spores have attached themselves to the miniature cracks the water damage caused. After the area is thoroughly disinfected, a rebuilding and restoration team can begin work.
Sewer damage in a multi-floor commercial building can easily be dealt with by a certified water mitigation team. They can get the area repaired or restored quickly so that you can resume operations
How To Properly Clean Your Microwave
7/28/2022 (Permalink)
How To Properly Clean Your Microwave
Keeping your microwave oven clean is an essential aspect of basic kitchen maintenance. By cleaning your unit often, you can significantly reduce the risk of a fire. It’s crucial to be proactive in cleaning your kitchen appliances so that you can be well prepared to tackle any problems that may arise, whether it’s a smoke smell or a broken unit. Here are some simple but effective tips for cleaning your appliance properly and keeping your home in Country Life Acres, MO, safe from danger.
Clean the Grease Filter
You should always make sure that you’re cleaning the grease filter in your appliance at least once a month. To properly clean the grease filter, follow these steps:
- Soak it in detergent and hot water
- Remove debris from the filter by scrubbing it lightly
- Steer clear of cleaning products that contain ammonia
While these guidelines are a helpful starting point, it’s a good idea to consult the owner manual that came with your microwave to ensure that you clean your grease filter appropriately.
Wipe Down the Unit After Each Use
The best way to be consistent when cleaning your appliance is to wipe it down well after each use. This helps the unit function more effectively and prevents a smoke smell from occurring. Although this may seem like a tedious step, it’s necessary in order to properly maintain your unit and keep your home safe.
Clean the Vents
Finally, be sure to pay attention to the vent grill in your unit. This feature can accumulate large amounts of dirt and grease if isn’t cleaned on a regular basis. By taking a minute to wipe down your unit’s vents, you can help it stay clean and reduce the risk of a fire breaking out.
While it’s important to do what you can to maintain your microwave oven, accidents may still happen. If you notice a smoke smell coming from your unit, it can lead to fire damage and other complications. Don’t hesitate to call emergency restoration services no matter what state your home is in.
How To Keep Your Business Safe During a Storm
7/12/2022 (Permalink)
How to Protect Your Company During a Storm
If you are expecting a rain storm in Town and Country, MO, it is important to take proper safety precautions. Doing so will allow you and your employees to feel better prepared and more secure. Here are some tips to keep your buildings, and the people inside them, safe during a storm.
1. Trim trees near your building
During a thunderstorm, high winds can cause trees and branches to slam into buildings and potentially cause damage, especially if they are located near windows. Keeping trees trimmed can lower the risk of this damage.
2. Maintain lightning rods around your building.
A severe rain storm is often accompanied by lightning. Using lightning rods can reduce electrical damage to your building, so it is important to have lightning rods inspected and maintained regularly.
3. Make sure employees are kept away from windows and skylights
Windows can be damaged during a storm, especially if there are high winds that can blow debris into them. Employees should be kept away from these areas to eliminate the possibility of harm from shattered glass.
4. Have a safety plan
If you are unprepared, a severe thunderstorm can turn your workplace into a chaotic environment. It is a good idea to have a plan in place for emergencies and to make sure that all employees are aware of any safety procedures.
What To Do After a Storm
The actions that you take after a storm can be just as important as the ones that you take during a storm. After a storm, your building may have sustained some damage and it is a good idea to repair this damage as soon as possible to prevent it from becoming worse. You can call an emergency repair service to take care of this for you. Keep these tips in mind to stay prepared the next time you are expecting a severe rain storm in Town and Country, MO.
Restoring Your Home in the Aftermath of a Storm
7/2/2022 (Permalink)
Storm Tips
The aftermath of a storm in Chesterfield, MO, can be devastating in many ways. In addition to inflicting immediate damage to your home, storms can cause water buildup in your home, leading to long-term problems. A damage restoration team can help you get your home back in working order, and there are also storm tips that you can use to safeguard against further harm.
Identifying Contaminated Water
Severe storms may cause sewage backups and broken pipelines and flood your home with contaminated water. Being able to identify the type of water in your home can help you maintain your safety. There are several types of contamination, including:
Clean water - uncontaminated water that may still promote bacterial or mold growth if left untreated
Gray water - contaminated water that may lead to discomfort and illness
Blackwater - severely contaminated water that could lead to illness and/or death
Storm damage comes in many forms and can even extend past the immediate harm inflicted on your home. As any list of storm tips will point out, it is important to be cautious in handling sewage backups in your home. In addition to identifying the category of contamination, you can protect yourself by using professional services to rid your home of tainted water. A properly trained technician has the tools and expertise to safely dispose of the water.
Safely Documenting Damage
When it is safe to do so, return to the house to thoroughly document the extent of the damage. Documentation helps the restoration team know what needs to be done to get your home back to its optimal condition.
In addition to flooding, the house may also become a breeding ground for mold and other safety hazards. At the top of the list of a storm, tips are strategies for maintaining your own safety. Your well-being should be prioritized. If possible, try to stay with friends or family until your home is properly restored.
3 Easy Steps To Replace A Leaking Toilet
6/28/2022 (Permalink)
How to Replace a Leaking Toilet
When you have a leaking toilet in your Chesterfield, MO, home, you want to replace it before there is severe damage done to the floor around it. Replacing a toilet can quickly be done when following these three easy steps.
1. Turn Off the Water
Turn the water valve behind the toilet clockwise until it can't turn anymore. Next, flush your toilet multiple times to get as much water out of the tank and bowel as possible. Remove the tank's lid and use a small cup, sponge or wet/dry vacuum to get the rest of the water out. Once the water has been removed, disconnect the water supply line from the toilet.
2. Remove the Old Toilet
To remove the leaking toilet, take off both nuts on the bolts on either side of the toilet's base. Gently wiggle the toilet to help loosen it from the wax ring. When the toilet starts to have more give, lift it directly up and move it out of the way. Placing it on a tarp or cardboard can help keep any water or dirt from getting on the floor. After removing the toilet, inspect the ground underneath where it was seated. If you notice any soft spots or rotting areas, call some water damage professionals to address the issue before replacing the toilet.
3. Replace the Seal and Replace the Toilet
Most experts on toilet repair recommend using a silicone seal for a toilet instead of a wax one because wax seals are so temperamental. Clean the flange on the floor and replace the seal with your new silicone one. Position your new toilet over the seal, ensuring the holes in the base line up with the bolts on the floor. Lower the toilet and have a friend apply pressure to it while you tighten the nuts on the bolts. Reconnect the water supply line and turn the water main back on. Allow the toilet tank to fill, and the toilet is ready to be used.
Replacing a leaking toilet is quick and easy to do when you know the right steps to follow.
Our Newest General Manager!
6/21/2022 (Permalink)
 Congratulations to our newest general manager, Steve Burgdorf!
It’s time to announce our newest General Manager, Steve Burgdorf! Starting as a part-time employee over ten years ago, owner Kevin Thole says Steve has been instrumental to our mission and growth, rising through the ranks to his newest position.
In addition to his glow-up (featured above??), Steve has gained invaluable wisdom in the world of restoration and serving others. A typical day in the life of Steve includes showing up early and working late, solving problems and making sure operations run smoothly and efficiently. And while he’s great at those things, Steve’s favorite part of the job is helping people who have had their lives upended from property damage get back on their feet. There’s always something new, and the opportunity to see others reach their personal and professional goals gets Steve excited every day.
Steve is inspired by the positive and optimistic people around him — an optimism he also reflects — and relishes a challenge. Even when days are long and tough, Steve says that it is rewarding to know you’ve made a positive difference in people’s lives, and that makes everything worth it.
Thanks for all you do Steve! You’re a rockstar!
Stay tuned for an announcement regarding Steve’s other promotion this week!
What To Do If You Face Coinciding Water and Fire Damage
6/15/2022 (Permalink)
Residential Fire and Water Damage
A home fire can be devastating with a lengthy restoration process to follow. However, it's often overlooked how homes that endure fire damage typically incur water-related damages as well. Here is what to do if this situation impacts your Bella Villa, MO, home.
1. Call Home Restoration Professionals
After a fire, an emergency cleanup and restoration company can fully evaluate the property and take the necessary steps to repair any damages. These professionals have the proper equipment to safely restore your home from fire and smoke damage and are trained to clean up water issues if they are present.
2. Address Water Damage
A fire has to be put out one way or another, so homes often end up being water-logged after the flames are put out. A fire hose can expel about six gallons of water per minute, therefore your home can suffer damage from excess water by the time the fire is extinguished. It is paramount to remove standing water and dry out the space as quickly as possible to prevent mold growth or other harmful effects. This can compromise the building structure and should be taken care of immediately before moving on to other repair efforts.
3. Address Fire Damage
Once any water in the home has been taken care of, restoration experts can then move on to address smoke and fire-related damage. This typically consists of smoke and soot removal, sanitizing surfaces and removing smoke odors, as well as necessary home repairs. Depending on the extent of damage, minor repairs like painting or recarpeting could cap the process or major home construction could be possible.
Given the massive amounts of water used to put out a fire, homes can simultaneously face damage from both elements. If this happens, bring in restoration professionals who will work to address the water issues first before moving on to repair fire damage.
Clearing Drains and Gutters Before a Flood
6/2/2022 (Permalink)
Prevent Flood Damage To Your Home
Before flooding hits Maryland Heights, MO you have the power to take action and lessen potential harm to your home. It is especially important to ensure excess water can easily drain away in a storm. At any time of year, leaves and debris can pile up in gutters and on top of storm drains, so be sure to always keep them clean. Following these simple steps while the sky is still clear can help prevent the worst of future flood damage.
1. Twice a year, clean your gutters. This approach is a great way to avoid severe flooding. Each spring and fall, remove the covers from dry gutters. Put on gloves, and use your hands or a small tool to brush away debris. With your hose, run water through the cleared gutter to confirm uninterrupted flow. Don’t forget to rake up leaves and debris and put them in a proper container when you’re done.
2. Practice another gutter etiquette. This includes fixing leaky gutters, either yourself or with the help of a professional. You should also direct gutter downspouts away from your foundation and your neighbors’ properties.
3. Keep leaves and sticks in a yard waste bin. Yard debris left lying loose on your land can quickly end up in drains. This will exacerbate any flooding caused by a storm and lead to more problems in the long run.
4. Take time to check storm drains for debris piled on top. If you notice leaves and debris lying on the surface of storm drains, act rapidly to remove them with a rake or broom. As always, put everything you collect into a yard waste bin or another container.
Storm damage in Maryland Heights, MO often includes floods, one of the worst disasters that can strike your home. In addition to taking smart steps after a flood, such as calling restoration professionals, use the above list now to keep gutters and drains clear and ready to do their job in a storm.
4 Ways to Prevent Mold Development
5/25/2022 (Permalink)
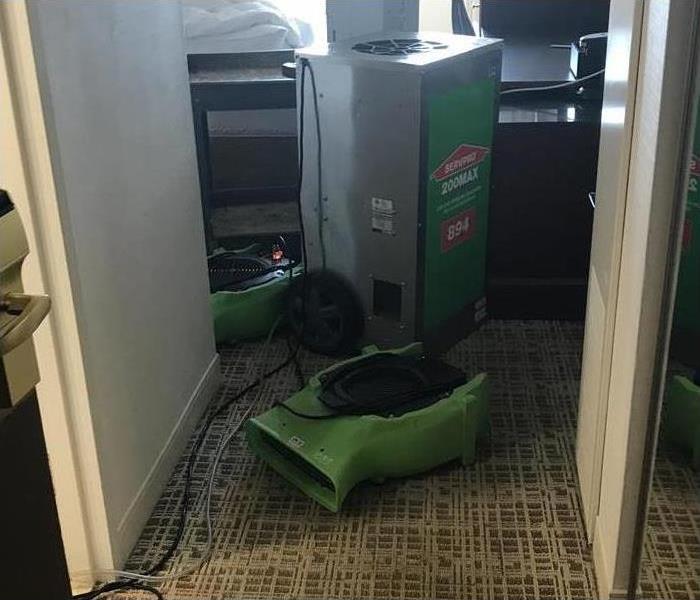 Consider running your air unit, fans, and dehumidifiers.
Ward Off Microbial Development
Mold removal takes time and costs money; therefore, business owners in Country Life Acres, MO, should work diligently to fight fungus growth. You'll want to avoid major shutdowns or the loss of revenue when competitors can grab your business. While such a situation can't be prevented completely, proprietors can take certain measures to decrease an infestation's likelihood. Adopt the following four routines to ward off microbial development.
1. Decrease Humidity Levels
Water reacts with spores, encouraging them to multiply; therefore, reducing moisture levels is significant in avoiding trouble. Consider running your air unit, fans, and dehumidifiers. The dryer space is, the less likely fungus can grow. If you have any hard-to-find locations or darker areas, such as closets, consider purchasing absorbent products.
2. Remove Mold Buildup
Fungus spreads within 24 to 48 hours, so act quickly if you suspect even minor issues. As soon as you notice an odd smell or water accumulation, call in experts. Commercial Mold cleanup requires the knowledge of a professional mold remediation company. Have the team not only sanitize the space but trash any structural pieces that contain microbes.
3. Clean the AC Unit
Spores like to hitch a ride in the air circulation, leaving air ducts an easy location to cultivate. Mold removal should include HVAC cleanings, reducing the possibility of it moving to other rooms.
4. Inspect Plumbing Fixtures
Avoid having leaky pipes or water overflows. These are breeding grounds for fungus and necessitate mold remediation assistance. Regularly inspect your bathroom equipment. Ensure that toilets and sinks function properly and that sewer pipes are not clogged. In addition, if you notice drips, have it repaired immediately. Water sitting for long periods of time simply invites microbial advancement.
Be proactive. Stay vigilant, overseeing your property with care. Don't allow moisture to accrue, keep the space dry and have the air unit cleaned. Mold removal, if needed, should be done as soon as possible and with the aid of experts.
Filing a Fire Claim Can Be Easy
5/18/2022 (Permalink)
Keep In Mind The 3 Following Tips
It was painful to watch your life's work go up in smoke. Now that the flames are gone and the air is cleared, how do you rebuild it? For many business owners, it means creating a fire claim and offering some financial relief in a time of hardship. Don't let the thought of working with insurance bring you further down. You can do it.
1. Make a Call
As you begin the fire restoration stage, take the time to first call your insurer. During the conversation, open a claim, requesting financial assistance for the repairs. In addition, verify your deductible and as well as their coverage. Compare it with your own documentation, just to be sure. While you're on the phone, ask about any specifics that they require or any protocols that must be followed. It's important to be knowledgeable and in control from the beginning.
2. Stay in Contact
With the fire claim open, you now can work with a fire remediation company in Town and Country, MO. During each stage of the process, email your adjuster, letting them know about the progress and getting approval to move forward. At times, you may need to have the agency's inspector look at the building too. The reports are compared, granting permission to receive the funding. In the meantime, request an immediate okay to secure the property. Insurance companies want this to prevent further destruction. It also hinders vandals from entering.
3. Document Everything
The fire damage destroyed so much. While you may not want to see it, you need to have evidence of it. Take pictures of anything and everything, validating your requests for property loss replacement. Save the photos to your hard drive and e-mail them to your insurance agent. Finally, save your receipts. As you purchase items, it's important to note where the insurance money went.
A fire claim can be a lifeline that doesn't stress you out. Use it to get back up and running.
What Is Business Interruption Insurance?
5/13/2022 (Permalink)
Imagine your commercial property in St. Louis, MO burning, flooding, or being swept away in a tornado. Now, picture the devastation caused by the loss of income and business operations during the restoration process. Finally, envision the alternative of being financially stable while your livelihood is being repaired. When your business is closed for an extended period of time, you can rest easier with business interruption insurance.
How Does Business Interruption Insurance Work
Commercial property insurance typically covers cleaning, repairing and restoring your business assets after a fire or a large amount of water damage occurs. Protect yourself further by doing the following:
• Before damage happens, talk to your insurance agent about adding on business interruption insurance. This is not a separate policy, but rather an add-on to your current commercial insurance or part of a policy package. Do not assume you have this type of insurance and do not wait until after fire or flooding occurs to look into this preventative measure.
• After damage occurs, such as from a broken pipe or fire, first call a reputable fire and water restoration company. The experts come to your property, assess the damage and immediately make a plan for cleanup and restoration. Second, call your insurance agent. If the restoration plan is covered by your commercial insurance and entails closing your business for a lengthy period of time, business interruption insurance kicks in.
• Look into the details of your insurance plan. This additional insurance typically covers lost wages, including employee pay, and business operating expenses that occur while the property is closed for reconstruction due to damage.
• Keep the timing in mind. Usually, this insurance takes effect two days after the damage occurs and lasts until the business returns to normal operations. Reopening is likely to occur within thirty days from the time restoration is complete.
When a disaster occurs and your business in St. Louis, MO is on hold, your life moves on. The restoration expert helps your business return to preloss condition after flooding or flames, while business interruption insurance helps you remain financially stable during this period.
Quickly Discovering the Cause of a Shower Leak Can Prevent Major Damage
1/24/2022 (Permalink)
A leaking shower is more than just a minor annoyance – let go, it can become a structural nightmare. You should always check things out at the first sign of a bathtub leak to avoid a disastrous situation from occurring in your home in Creve Coeur, MO. A leaking shower could be anything from loose joints in the pipes to a simple shower pan leak and can range from a simple repair to all-out restoration. There are a few things that can be checked to help you ascertain where the leak is coming from and how serious the situation is.
How To Find the Source of a Shower Leak
•Inspect the plumbing components to see if they are wet or leaking
•Check the drainpipe and drain fittings to see that it is properly seated and caulked
•Ensure that any caulking is sound and free of breaks
•Check doors for gaps in the seal and around hinges to make sure they close tightly
•Look for any cracks or gaps around the shower pan that may be allowing water to get through
A bathtub leak or shower pan leak can sometimes be found by inspecting the ceiling of the room below the bathroom. Water stains or wood that is dark and wet is a reliable sign that something is heading south, as are bulging ceilings, wet carpet or sheetrock. In a tub, look for a loose seal around the drain fittings. This is the easiest fix and a good place to start. If you are dealing with a shower pan, likewise check the seal around the drain first. Also, inspect for cracks or gaps. In a tiled shower, the problem can be as simple as a loose tile that water is getting underneath or the need to re-caulk between tiles.
If you do find a leak, call on a professional restoration service in Creve Coeur, MO, to do an assessment and help remediate the situation before it gets worse. They can help protect your home and belongings from water damage. Checking regularly for a bathtub leak and taking proactive steps can give you peace of mind.


 24/7 Emergency Service