Recent Posts
Different types of fire extinguishers and how to use them
12/11/2024 (Permalink)
 Having the right fire extinguisher on hand can be the difference between a small, manageable fire and a devastating disaster.
Fire extinguishers are critical tools for fire safety, but not all are the same. Knowing the right extinguisher to use for different fire types is essential in protecting your property. According to the U.S. Fire Administration, more than 25% of fires in the U.S. occur in residential settings, making fire prevention and knowledge vital for every household and business owner. Let’s dive into the types of fire extinguishers and expert tips on how to use them.
Types of Fire Extinguishers
Fire extinguishers are classified by the type of fire they can effectively extinguish. Below is a breakdown of the most common fire extinguishers and their uses:
- Class A: Designed for ordinary combustibles like wood, paper, and cloth. This is the most common type used in homes and businesses.
- Class B: Ideal for fires fueled by flammable liquids such as gasoline, oil, and grease. These extinguishers are commonly found in kitchens and garages.
- Class C: Specifically made for electrical fires, Class C extinguishers are vital for dealing with fires involving wiring, appliances, or circuits.
- Class D: These extinguishers are used for fires involving flammable metals like magnesium and aluminum, most commonly seen in industrial settings.
- Class K: Specifically designed for kitchen fires involving cooking oils and fats, making them essential for commercial kitchens and restaurants.
How to Use a Fire Extinguisher
Knowing how to properly use a fire extinguisher is just as important as having the right type. The simple acronym to remember is PASS:
- Pull the pin to break the seal.
- Aim the nozzle at the base of the fire.
- Squeeze the handle to release the extinguishing agent.
- Sweep from side to side, continuing to aim at the base until the fire is out.
When to Use a Fire Extinguisher
It’s important to use a fire extinguisher only when the fire is small and contained. If the fire has spread or is too large, evacuate immediately and call the fire department. Always position yourself between the fire and a safe exit so you can retreat if needed.
Having the right fire extinguisher on hand can be the difference between a small, manageable fire and a devastating disaster. Regularly checking that extinguishers are in good working order and easily accessible can make all the difference in an emergency. At SERVPRO® of St. Louis County NW, we’re committed to helping you protect your property. Whether you need fire damage restoration or expert advice on fire safety, we are Here to Help®.
The Importance of Mold Inspections in Preventing Infestations
11/13/2024 (Permalink)
 Don’t wait until mold becomes a serious issue—schedule a mold inspection today to safeguard your property.
Mold is more than just an eyesore; it’s a persistent problem that can cause significant damage to your property if left unchecked. For homeowners and business owners alike, regular mold inspections are essential in preventing infestations and maintaining the integrity of your structure. Understanding the importance of mold inspections can save you from costly repairs and ensure that your property remains mold-free. Here’s why you should prioritize mold inspections and what you need to know about the process.
Why Mold Inspections Are Crucial
Mold thrives in damp, dark environments, often growing in hidden areas that are difficult to detect. Without regular inspections, mold can spread unnoticed, leading to extensive damage to walls, ceilings, and even the foundation of your property. One study by the Federal Emergency Management Agency (FEMA) found that mold can begin to grow on a damp surface within 24 to 48 hours after water exposure, illustrating just how quickly a small issue can escalate into a significant problem.
Routine mold inspections help identify problem areas before they become severe. An inspection can uncover hidden leaks, moisture buildup, and early signs of mold growth, allowing you to take action before the situation worsens. This proactive approach can save you time, money, and the stress of dealing with a full-blown mold infestation.
Key Areas for Mold Inspections
While mold can grow anywhere there is moisture, certain areas are more susceptible to mold growth than others. During an inspection, professionals will focus on:
- Basements and Crawl Spaces: These areas are often damp and poorly ventilated, making them prime spots for mold.
- Bathrooms and Kitchens: Frequent water usage in these rooms can lead to mold growth, especially in areas around sinks, showers, and under appliances.
- Attics: Poor ventilation and roof leaks can create the perfect environment for mold to thrive in attics.
- HVAC Systems: Mold spores can easily spread through your home or business via the HVAC system, making it a critical area for inspection.
By focusing on these key areas, mold inspections can help you catch and address mold problems early, preventing them from spreading throughout your property.
The Mold Inspection Process
A thorough mold inspection involves several steps designed to identify and assess mold issues. Here's what you can expect during a professional mold inspection:
- Visual Inspection: The inspector will begin by visually examining your property for signs of mold, moisture, and water damage.
- Moisture Mapping: Using specialized equipment, the inspector will measure moisture levels in various areas of your property to identify hidden moisture that could lead to mold growth.
- Air and Surface Sampling: Samples may be taken from the air and surfaces to detect mold spores and determine the extent of contamination.
- Reporting and Recommendations: After the inspection, you'll receive a detailed report outlining the findings and recommendations for remediation if necessary.
Long-Term Prevention Through Regular Inspections
Regular mold inspections are a vital part of property maintenance, particularly in areas prone to moisture and humidity. By scheduling annual or bi-annual inspections, you can ensure that your property remains mold-free and structurally sound. Prevention is always more cost-effective than remediation, and with mold, early detection is key.
At SERVPRO of St. Louis County NW, our experienced professionals are trained to conduct thorough mold inspections and provide expert remediation services. We understand the importance of protecting your property from mold infestations, and we’re here to help you every step of the way.
Don’t wait until mold becomes a serious issue—schedule a mold inspection today to safeguard your property and prevent costly damage. Reach out to SERVPRO of St. Louis County NW, and let us help you keep your home or business mold-free.
Standing Water in Homes: Unseen Dangers and Personal Risks
10/9/2024 (Permalink)
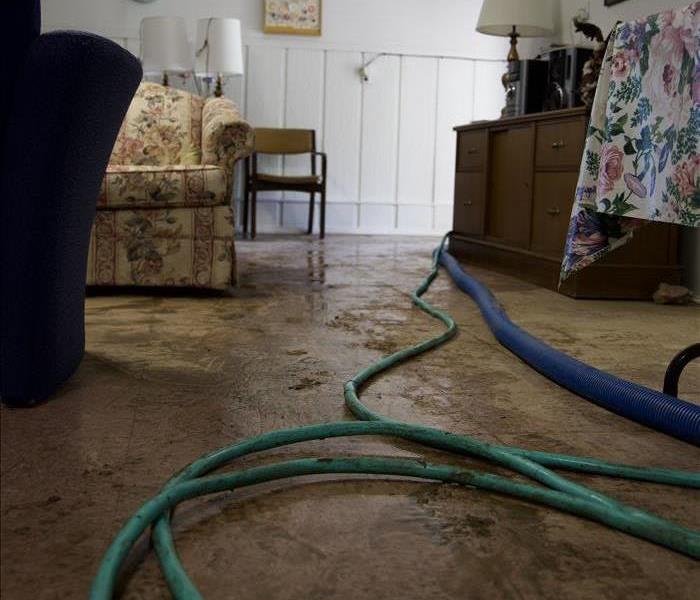
 Explore the dangers associated with standing water and the importance of addressing it promptly.
Standing water in St. Louis homes can be more than just a nuisance—it poses serious risks to both the structural integrity of a property and the safety of its inhabitants. Often caused by leaks, flooding, or malfunctioning appliances, standing water can quickly become a breeding ground for damage. This blog explores the dangers associated with standing water and the importance of addressing it promptly.
Structural Damage and Long-term Consequences
One of the most significant risks of standing water in a home is structural damage. Water can seep into the foundation, walls, and floors, weakening them over time. This can lead to warping, swelling, and deterioration of building materials. According to the Environmental Protection Agency (EPA), prolonged exposure to standing water can cause wood rot, corrosion of metal components, and deterioration of concrete structures. The longer water remains stagnant, the more extensive the damage becomes, potentially leading to costly repairs and even compromising the safety of the building.
Electrical Hazards: A Silent Threat
Standing water can also create dangerous electrical hazards. Water and electricity are a lethal combination; any contact between the two can result in electrical shorts, circuit damage, or even fire hazards. It’s crucial to remember that even small amounts of water can cause significant issues if they reach electrical wiring, outlets, or appliances. Homeowners should always exercise caution and avoid contact with standing water near electrical sources until a professional can assess the situation.
Mold Growth: A Costly Consequence
While not directly related to health, mold growth is another consequence of standing water that can lead to severe property damage. Mold can proliferate in moist environments, affecting walls, ceilings, and personal belongings. According to a study by the Institute of Inspection, Cleaning and Restoration Certification (IICRC), mold can begin to grow within 24-48 hours of water exposure. The presence of mold can devalue a property, lead to expensive remediation processes, and cause irreparable damage to belongings.
Preventative Measures and Professional Solutions
To prevent the risks associated with standing water, homeowners should regularly inspect their homes for potential water sources, maintain proper drainage, and fix leaks promptly. In cases where standing water is detected, it’s essential to contact a professional water damage restoration service like SERVPRO®. Their team of experts can efficiently remove standing water, dry the affected areas, and restore the property to prevent further damage.
Conclusion: Act Quickly to Mitigate Risks
Standing water in homes is a serious issue that can lead to significant structural damage and costly repairs. By understanding the dangers and taking swift action, homeowners can protect their properties and ensure a safe living environment. If you encounter standing water in your home, don’t hesitate to reach out to SERVPRO for professional assistance.
Expert Storm Damage Restoration in Missouri: The Role of SERVPRO®
9/11/2024 (Permalink)
 We explore the crucial role SERVPRO plays in St. Louis, Missouri storm damage restoration and how our expertise can help you get back on your feet.
Missouri is no stranger to severe weather, with storms frequently causing significant damage across the state. As a trusted leader in storm damage restoration, SERVPRO® is dedicated to helping Missouri residents recover quickly and efficiently from the devastating effects of storms. In this blog, we’ll explore the crucial role SERVPRO plays in St. Louis, Missouri storm damage restoration and how our expertise can help you get back on your feet.
Missouri Storm Damage: A Stark Reality
According to the National Weather Service, Missouri experiences an average of 30 tornadoes annually, causing extensive damage to homes and businesses. In addition, severe thunderstorms, flooding, and hailstorms are common, further contributing to the destruction. The aftermath of these natural disasters can be overwhelming, but that's where SERVPRO steps in to provide professional and reliable restoration services.
Rapid Response and Expert Assessment
When a storm strikes, time is of the essence. SERVPRO understands the urgency of storm damage restoration and offers a rapid response to mitigate further damage. Our team of highly trained professionals is equipped to handle the most challenging situations, providing immediate assessments to determine the extent of the damage.
By using advanced technology and equipment, we can identify hidden moisture and structural issues that may not be immediately apparent. This thorough evaluation ensures that all areas of damage are addressed, preventing potential problems down the line.
Comprehensive Restoration Services
SERVPRO offers a wide range of restoration services tailored to meet the unique needs of Missouri residents affected by storm damage. Our services include:
- Water Damage Restoration: From water extraction to drying and dehumidification, we tackle all aspects of water damage caused by storms.
- Structural Repairs: We provide repairs for roofs, walls, and other structural components damaged by high winds, hail, or fallen debris.
- Mold Remediation: Post-storm conditions can lead to mold growth. Our team conducts thorough mold inspections and remediation to ensure a safe environment.
- Contents Restoration: Personal belongings and valuable items can often be salvaged. We use specialized cleaning techniques to restore your possessions to their pre-storm condition.
Customer-Centric Approach
At SERVPRO, our commitment to customer satisfaction sets us apart. We understand that dealing with storm damage is stressful, so we strive to make the restoration process as smooth and hassle-free as possible. Our team works closely with insurance companies to streamline claims and ensure you receive the support you need.
Preventative Measures and Preparedness
Beyond restoration, SERVPRO also emphasizes the importance of preparedness. We offer tips and resources to help Missouri residents better prepare for future storms. From creating emergency plans to reinforcing vulnerable areas of your home, our goal is to minimize the impact of future storms on your property.
Trust SERVPRO for Storm Damage Restoration
With decades of experience and a proven track record, SERVPRO is the trusted choice for storm damage restoration in Missouri. Our comprehensive services, rapid response, and customer-focused approach make us the ideal partner in your recovery journey.
If you’re facing storm damage, don’t hesitate to contact SERVPRO for expert assistance. We’re here to help you rebuild and restore, ensuring your home or business is back to normal as quickly as possible.
Keep Your Home Safe: The Essential Role of Smoke Detectors
8/14/2024 (Permalink)
 This blog explores why smoke detectors are essential for home safety and how they can protect your family.
When it comes to home safety, smoke detectors are indispensable. These devices serve as the first line of defense against the devastating effects of fires. In St. Louis, MO, where a blend of historical and modern homes presents unique fire risks, ensuring every residence is equipped with working smoke detectors is crucial. This blog explores why smoke detectors are essential for home safety and how they can protect your family.
Early Detection Saves Lives
The Vital Importance of Early Warning
Smoke detectors provide early warning signals that can be the difference between life and death in a fire emergency. Fires can spread rapidly, and the earlier you are alerted, the more time you have to escape. Smoke detectors are designed to detect even the slightest presence of smoke, giving you and your family precious moments to react and evacuate.
Reducing Fire-Related Injuries and Fatalities
According to the National Fire Protection Association (NFPA), three out of five home fire deaths occur in homes without working smoke detectors. The presence of functioning smoke detectors cuts the risk of dying in a fire by half. This statistic alone underscores the critical role these devices play in enhancing home safety.
Types of Smoke Detectors
Ionization vs. Photoelectric Detectors
There are two main types of smoke detectors: ionization and photoelectric. Ionization detectors are more responsive to flaming fires, while photoelectric detectors are better at sensing smoldering fires. For optimal protection, it is recommended to have both types installed or to use dual-sensor smoke alarms that incorporate both technologies.
Proper Placement and Maintenance
To maximize their effectiveness, smoke detectors should be installed in every bedroom, outside each sleeping area, and on every level of the home, including the basement. Regular maintenance is also crucial. Test smoke detectors monthly, replace batteries at least once a year and replace the units themselves every ten years.
The Impact on Property Protection
Minimizing Property Damage
Beyond saving lives, smoke detectors also help in minimizing property damage. By providing early alerts, they allow for quicker response times, which can limit the spread of fire and smoke, ultimately reducing the overall damage to your home.
Insurance Benefits
Homes equipped with smoke detectors may also benefit from reduced insurance premiums. Many insurance companies offer discounts for homes with functioning smoke alarms, recognizing their effectiveness in mitigating fire-related risks.
SERVPRO® is Your Fire Safety Partner
SERVPRO is dedicated to ensuring your home is safe and prepared for any fire emergency. Our team offers expert fire damage restoration services and valuable advice on maintaining your smoke detectors. Contact us to learn more about how we can help protect your home and loved ones.
Smoke detectors are a simple yet powerful tool for safeguarding your home and family. By ensuring that your smoke detectors are properly installed and maintained, you can significantly enhance your home's safety and peace of mind. Remember, a small investment in smoke detectors today can save lives and property tomorrow.
Signs of Mold Infestation: What to Look For
7/10/2024 (Permalink)
 Early detection can make a significant difference in preventing further spread and minimizing the impact on your property.
As a homeowner, being able to recognize the signs of a potential mold infestation is crucial for maintaining a safe and healthy indoor environment. Early detection can make a significant difference in preventing further spread and minimizing the impact on your property. Here are some key indicators to watch for:
Musty Odors
If you notice a persistent musty or earthy odor in certain areas of your home, it could be a sign of hidden mold growth. Pay attention to any unpleasant smells, especially in poorly ventilated or moisture-prone areas.
Visible Mold Growth
The presence of visible mold in the form of black, green, or white patches on surfaces such as walls, ceilings, or floors is an obvious sign of infestation. Keep an eye out for any discoloration, fuzzy growth, or staining, as these are clear indications of mold presence.
Water Stains and Discoloration
Water stains, discoloration, or warping on surfaces like walls and ceilings can signal an underlying moisture issue and potential mold growth. These signs are often linked to leaks, condensation, or water damage, all of which can create favorable conditions for mold to thrive.
Peeling or Bubbling Paint
Peeling or bubbling paint on walls and ceilings can be an indication of moisture infiltration, which can lead to mold growth beneath the surface. If you notice these signs, it's important to investigate the underlying cause and address any moisture-related issues promptly.
Damp or Moldy Smells on Personal Belongings
Items stored in damp or mold-prone areas, such as basements, attics, or closets, may develop a damp or musty smell due to mold growth. Recognizing this odor on your belongings could signal the need for closer inspection and potential remediation efforts.
Being attentive to these signs of mold infestation can help you identify and address the issue early, minimizing the potential impact on your home. If you notice any of these signs, consider reaching out to a professional mold remediation service like SERVPRO® for a comprehensive inspection and effective solutions.
At SERVPRO, our experienced team is dedicated to identifying and addressing mold infestations with advanced techniques and expertise. We understand the urgency of mold concerns and can provide the necessary support to restore your home to a safe and healthy condition.
Maintaining a proactive approach and promptly seeking professional assistance can help safeguard your property and maintain a comfortable living environment for you and your family. For more information and expert guidance on addressing mold infestations, feel free to contact SERVPRO for comprehensive assistance and peace of mind.
Creating a Comprehensive Family Emergency Plan for Water-Related Incidents
6/7/2024 (Permalink)
Water-related emergencies can occur suddenly and without warning, posing serious risks to life and property. From floods and burst pipes to contaminated water supplies, having a well-thought-out family emergency plan in place is crucial for ensuring the safety and well-being of your loved ones. In this blog, we'll outline the essential steps for creating a comprehensive family emergency plan specifically tailored to water-related incidents, empowering you to respond effectively and mitigate risks in times of crisis.
Step 1: Assess Potential Risks and Hazards
Begin by identifying potential water-related risks and hazards in your area, such as flooding zones, aging plumbing systems, and contamination sources. Research historical weather patterns, flood maps, and local emergency resources to gain a better understanding of the specific risks your family may face.
Step 2: Develop an Emergency Communication Plan
Establish a clear communication plan that outlines how your family will stay in touch during a water-related emergency. Designate an out-of-area emergency contact whom family members can call or message to provide updates on their status and whereabouts. Ensure that everyone knows how to reach this contact and has access to multiple communication methods, such as cell phones, landlines, and social media.
Step 3: Create an Evacuation Plan
Develop a detailed evacuation plan that outlines evacuation routes, designated meeting points, and transportation options in the event of flooding or other water-related emergencies. Identify safe locations where your family can seek shelter, such as higher ground, community centers, or emergency shelters. Practice evacuation drills regularly to ensure that everyone knows what to do and where to go in an emergency.
Step 4: Prepare an Emergency Kit
Assemble a comprehensive emergency kit containing essential supplies to sustain your family for at least 72 hours during a water-related emergency. Include items such as non-perishable food, water, first aid supplies, flashlights, batteries, blankets, and personal hygiene products. Customize your emergency kit to meet the specific needs of your family members, including medications, pet supplies, and baby care items.
Step 5: Safeguard Your Home
Take proactive measures to safeguard your home against water-related incidents, such as flooding and burst pipes. Install flood barriers, sump pumps, and backflow preventers to minimize the risk of water intrusion. Insulate pipes, repair leaks, and maintain your plumbing system regularly to prevent burst pipes and water damage. Keep gutters and downspouts clear of debris to ensure proper drainage away from your home's foundation.
Step 6: Stay Informed and Stay Calm
Stay informed about weather forecasts, flood warnings, and emergency alerts issued by local authorities. Monitor news updates and official channels for information on water-related incidents and evacuation orders. Remain calm and level-headed during emergencies, and follow the guidance of emergency responders and authorities to ensure the safety of your family.
Creating a family emergency plan for water-related incidents is essential for protecting your loved ones and minimizing risks during times of crisis. By assessing potential risks, developing a communication plan, creating an evacuation plan, preparing an emergency kit, safeguarding your home, and staying informed, you can empower your family to respond effectively to water-related emergencies and stay safe in any situation. Remember, preparedness is key to surviving and thriving in the face of adversity, so take the time to create a comprehensive emergency plan and ensure the safety and well-being of your family members.
Weathering the Storm: Spring Cleanup Tips for North Central Regions
5/8/2024 (Permalink)
As spring ushers in warmer temperatures, blossoming flowers, and the promise of renewal, it also brings the potential for severe weather in North Central regions. From thunderstorms to heavy rainfall, the aftermath of these spring storms can leave homeowners facing a cleanup challenge. In this blog, we'll explore essential tips tailored for North Central areas to navigate the aftermath of spring storms and restore homes to their former glory.
Assess the Exterior
After a storm, start by conducting a thorough assessment of your home's exterior. Look for signs of damage to the roof, siding, windows, and doors. Check for loose shingles, damaged gutters, or debris that may have accumulated around the property.
Spring storms can leave a trail of debris in their wake. Safely clear fallen branches, leaves, and other debris from your yard. Pay attention to potential hazards such as broken glass or sharp objects. If the debris is extensive, consider professional assistance for a thorough cleanup.
Inspect for Water Damage
Heavy rainfall during spring storms can lead to water intrusion. Inspect your home for signs of water damage, including dampness, water stains, or mold growth. If you detect any issues, it's crucial to address them promptly to prevent further damage and mold development.
Basements are vulnerable to flooding during spring storms. Inspect your basement for water ingress, dampness, or standing water. If you find any issues, consult professionals for proper water extraction and drying to prevent long-term damage.
Examine Trees and Limbs
High winds during storms can cause damage to trees and branches. Check for any compromised trees or hanging limbs that may pose a risk. Trim back branches that could potentially fall and cause damage to your home or neighboring properties.
The HVAC system plays a crucial role in maintaining a comfortable and healthy indoor environment. Inspect the outdoor unit for any storm damage or debris accumulation. If you notice any issues, contact HVAC professionals for a thorough inspection and repairs.
Test Electrical Systems
Spring storms can lead to power outages or electrical issues. Test your electrical systems, including outlets, switches, and circuit breakers, to ensure they are functioning correctly. If you notice any abnormalities, seek the assistance of a licensed electrician.
In the unfortunate event that your property sustains significant damage, document it thoroughly for insurance claims. Take photographs of the damage, make a list of affected items, and keep all related paperwork organized. This documentation will aid in a smoother insurance claims process.
Consider Professional Restoration Services
For extensive storm damage, consider enlisting the help of professional restoration services like SERVPRO. Experienced technicians can efficiently assess, clean, and restore your property, ensuring a thorough recovery process.
As North Central regions are prone to spring storms, strengthening your emergency preparedness is essential. Ensure you have an emergency kit, including essential supplies, and a family communication plan in place.
In conclusion, spring storms may be unpredictable, but your response to their aftermath can be strategic. By following these tailored cleanup tips for North Central regions, you can navigate the challenges of spring storm aftermath and restore your home to its pre-storm condition. Remember, a proactive approach and professional assistance can make a significant difference in the efficiency and effectiveness of your cleanup efforts.
Sounding the Alarm: The Critical Role of Smoke Detectors in Home Safety
4/8/2024 (Permalink)
Home is a sanctuary, a place of comfort and security. Yet, unforeseen dangers like fire can threaten this haven. Smoke detectors stand as vigilant guardians, providing an early warning system that is fundamental to the safety of every household. In this blog, we explore the indispensable role of smoke detectors in safeguarding lives and property.
Early Detection Saves Lives
The primary function of a smoke detector is to detect the presence of smoke, signaling the possibility of a fire in its early stages. This early detection is crucial, as it allows residents to respond swiftly, potentially escaping harm or taking necessary actions to contain the fire.
Smoke detectors are designed to emit a loud, piercing alarm when smoke is detected. This immediate alert not only notifies those inside the home but also acts as a call to action for emergency responders, ensuring a quicker response time in the event of a fire.
Protection During Sleep
Fires can occur at any time, including when occupants are asleep. Smoke detectors provide a critical layer of protection during these vulnerable hours, waking residents and giving them the precious seconds needed to evacuate safely.
Modern smoke detectors are equipped with advanced technology that can detect various types of smoke, including slow smoldering fires and fast-flaming fires. This versatility enhances their effectiveness in providing comprehensive coverage.
Installation Flexibility
Smoke detectors are adaptable to various living spaces. They can be installed in bedrooms, hallways, kitchens, and common areas, ensuring comprehensive coverage throughout the home. Installing detectors in interconnected systems further enhances their effectiveness.
Smoke detectors play a central role in home fire escape plans. Their early warning signals allow occupants to enact predetermined escape routes, making the evacuation process more organized and reducing the risk of panic during emergencies.
Building Codes
Many building codes mandate the installation of smoke detectors in residential structures. Compliance with these regulations not only ensures the safety of occupants but also contributes to the overall fire safety of communities.
Modern smoke detectors are designed for convenience and low maintenance. Regular testing and occasional battery replacements are simple tasks that significantly contribute to their reliability.
Affordable and Accessible
Smoke detectors are widely available at affordable prices, making them a cost-effective investment in home safety. Their accessibility ensures that households of all income levels can benefit from this essential safety device.
In addition to detecting flames, smoke detectors are critical for identifying silent but deadly threats like carbon monoxide. Many modern detectors are equipped to sense elevated levels of carbon monoxide, providing comprehensive protection for residents.
Peace of Mind for Families
Knowing that smoke detectors are actively monitoring for potential fire hazards provides peace of mind for families. This sense of security allows residents to focus on enjoying their homes without the constant worry of undetected fire risks.
The integration of smoke detectors with smart home systems enhances their functionality. Smart detectors can send alerts to smartphones, enabling remote monitoring and notifications even when residents are away from home.
Smoke detectors are not mere accessories; they are life saving investments that form the backbone of home safety. From providing early warnings to facilitating rapid responses during emergencies, these devices are integral to the protection of lives and property. Every home should prioritize the installation, maintenance, and regular testing of smoke detectors to ensure a secure living environment for all.
Unmasking Mold: Common Causes of Growth in Homes
3/8/2024 (Permalink)
Mold growth is a pervasive issue that can silently infiltrate homes, causing structural damage and cosmetic concerns. While health effects are often discussed, it's equally important to understand the non-health-related factors that contribute to mold proliferation. In this blog, we'll unveil the common causes of mold growth in homes, shedding light on the hidden triggers that create an environment conducive to mold development.
Excessive Moisture
Mold thrives in damp environments, making excessive moisture the primary catalyst for its growth. Leaky roofs, plumbing issues, and poor ventilation can create pockets of moisture within the home, providing an ideal breeding ground for mold.
Inadequate ventilation traps moisture indoors, fostering conditions favorable for mold growth. Areas with limited air circulation, such as basements, attics, and poorly ventilated bathrooms, are particularly susceptible to mold infestations.
Water Leaks and Intrusions
Persistent water leaks from pipes, roofs, or windows can create a continuous source of moisture, encouraging mold to flourish. Addressing leaks promptly is crucial in preventing prolonged exposure to damp conditions.
Condensation occurs when warm, humid air comes into contact with cooler surfaces. Areas prone to condensation, such as windows, pipes, or uninsulated walls, provide a prime environment for mold growth. Controlling indoor humidity levels can mitigate this risk.
Flooding Incidents
Homes that have experienced flooding, whether from storms, burst pipes, or appliance malfunctions, are at a heightened risk of mold growth. Even after visible water is removed, residual moisture can linger, creating an environment conducive to mold infestations.
Clogged or poorly maintained gutters can lead to water overflow, causing moisture to seep into walls and foundations. Regular gutter maintenance is essential in preventing water-related issues that contribute to mold growth.
High Humidity Levels
Elevated humidity levels provide an ideal setting for mold to thrive. Humidity levels above 60% create conditions conducive to mold growth. Proper ventilation, dehumidifiers, and effective moisture management are key in controlling indoor humidity.
Insufficient insulation can lead to temperature differentials that result in condensation. This moisture buildup, coupled with a lack of proper ventilation, creates an environment where mold can proliferate.
Basements and crawl spaces are particularly susceptible to mold growth due to their proximity to the ground and potential for water intrusion. Proper waterproofing and ventilation measures are essential in minimizing the risk of mold in these areas. Procrastinating on necessary repairs, whether for a leaking roof, plumbing issue, or damaged siding, allows moisture to persist, creating conditions conducive to mold growth. Timely repairs are crucial in preventing prolonged exposure to damp environments.
Understanding the common causes of mold growth in homes empowers homeowners to take proactive measures in mitigating the risks. By addressing issues related to moisture, ventilation, and maintenance promptly, individuals can create an environment that is less conducive to mold proliferation. Regular inspections, proper ventilation practices, and timely repairs are essential components of a vigilant approach to mold prevention, ensuring a home that is resilient to mold growth.


 24/7 Emergency Service